Skip to content

WINDOWS 10 MINING ETC AFTER EPOCH 390 [NOVEMBER 2020]

This is a quick guide on how to use T-Rex on your Windows 10 computer to allow your NVidia 1080 Ti cards to run after the epoch. Ethereum Classic has a hardform at Epoch 390 which should fall on or around November 28th 2020. To keep mining afterwards you will have to update your miner to one that supports the new fork. For this, I have chosen to switch over to T-Rex.

On my Windows computer:
Open a web browser
Navigate to
https://github.com/trexminer/T-Rex/releases

Download
https://github.com/trexminer/T-Rex/releases/download/0.18.11/t-rex-0.18.11-win-cuda10.0.zip

Unzip t-rex-0.18.11….

Your Antivirus will probably send you a warning, so you will have to create an exception for it.

Now right click on the .bat file you want to run. For me, I will be mining ETC, so I will right click on ETC-2miners.bat

Once the file is open, I will save it as Tacticalware.bat

Next you will want to change the mining pool to whichever one you use. I use ethermine

You will want to modify the wallet address that shows in the file, and replace it with your wallet address

At the end of the changes, my file looks like this:
t-rex.exe -a ethash –coin etc -o stratum+tcp://us1-etc.ethermine.org:4444 -u 0xb2bc70cD85e20c96c8967CAECcE20a238ee9950D -w tacticalware –fork-at etchash=epoch:390

pause


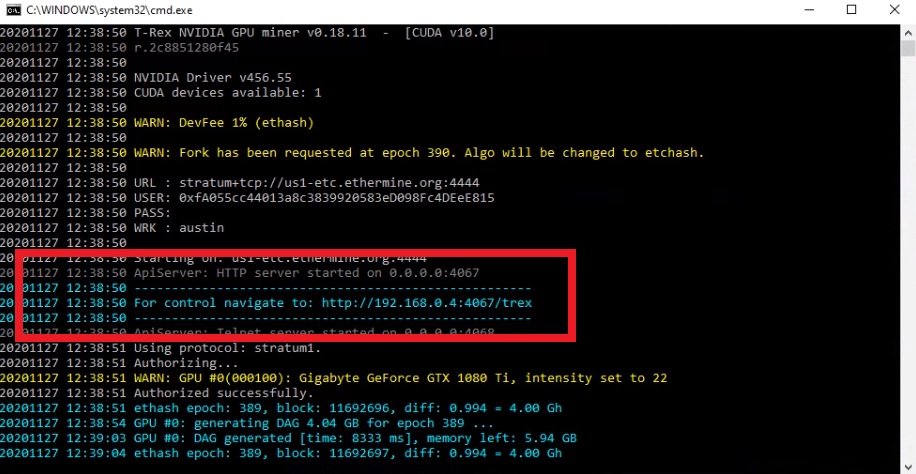
Save the file, and then run it. You can monitor the progress by navigating watching your hashes on the ethermine site, or navigate to the local t-rex site that is created on your computer.

The address will look something like this, and be displayed when you begin mining
t-rex


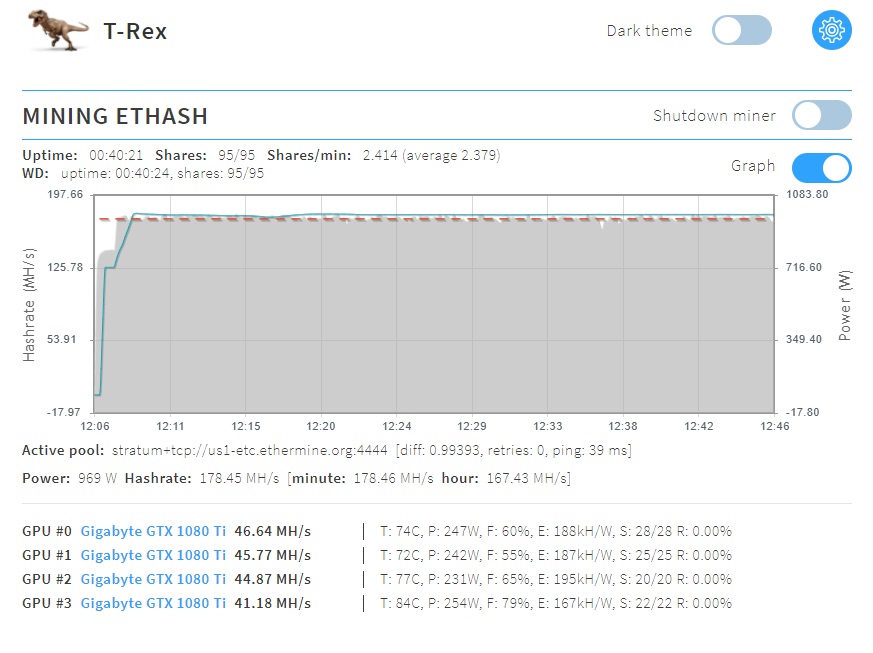
When you browse to that site you will see something that looks like this:

t-rex

You can now monitor your mining rig through a browser

Thanks for reading

The hardware that I used in this guide:
Gigabyte AORUS GeForce GTX 1080 Ti (QTY 4):
https://amzn.to/2JqvXC8

Motherboard (QTY 1): 
https://amzn.to/2JqGJZ7

CPU (QTY 1): 
https://amzn.to/3qevp2X

Memory (QTY 1): 
https://amzn.to/2JqHn8Z

Hard Drive (QTY 1):  
https://amzn.to/3nZ5pH4

Risers (QTY 4):  
https://amzn.to/33rIgVE

Power Supplies (QTY 2):
https://amzn.to/3fTRpLR

Add2PSU (QTY 1):
https://amzn.to/39s4URY

Power Switch (QTY 1):  
https://amzn.to/3ljmNVk


POWER BI – DISABLE DATE/TIME HIERARCHY

  • Power BI

Sick of your system being bogged down by the overhead of the autocalculations for the Date/Time fields. Here is how you disable that feature:

Inside Power BI
Go to File
Click Options and Settings
Select Options
Find GLOBAL and look at the options below it
Select Data Load
Uncheck Auto date/time for new files
Find CURRENT FILE and look at the options below it
Select Data Load
Uncheck Auto date/time

WINDOWS 10 – DISABLE WINDOWS DEFENDER THROUGH GPOs

I cannot stand Windows Defender. Constantly destroys my crypto wallets. Here is the latest way to shut it down and disable it

In the Type here to search field
Type
gpedit.msc
Click Enter
Group Policy Editor will open

Navigate to
Computer Configuration > Administrative Templates > Windows Components > Microsoft Defender Antivirus
Open Turn off Microsoft Defender Antivirus
Set to Enabled
Click Ok

Select the Real-time Protection folder
Open Turn off real-time protection
Set to Enabled
Click Ok
Select Turn on behavior monitoring
Set to Disabled
Click Ok
Open Monitor file and program activity on your computer
Set to Disabled
Click Ok
Open Turn on process scanning whenever real-time protection is ….
Set to Disabled
Click Ok

Restart your computer…..And reinstall your wallet that was just destroyed by Microsoft’s disgusting practices.

POWER BI CALENDAR / DATE TABLE

  • Power BI

If your data warehouse does not have a date table or a time table, how do you create it within Power BI….well here you go

In Power BI
Click the Modeling tab
Select New Table
Type in:
Calendar = CALENDARAUTO(6)


Note:
CALENDAR – You will supply the Start and End Date
CALENDARAUTO – Looks through all the dates in the model and automatically builds out the range. If your model begins on July 15, 1979 and your fiscal year end is June 30th, if you set CALENDARAUTO(6) it will allow all dates from July 15, 1979 to June 30, 2021. If you leave CALENDARAUTO() blank, it will go to the end of the year (December 31).

DATA MODELING BEST PRACTICES

  • Power BI

To get the best results in your Power BI model, use the following below as a checklist

  • Data Model changes do not impact the source. If you need source data always changed, you will need to modify that directly or through Power Query
  • For the Data Model, only pull the data you need
  • If you need the database to do some work, push it back down to the database to do it. Save your local workstation the hassle.
  • Data warehouse…build one
  • Set your data types (date, decimel, etc)
  • Disable the default summarization
  • Categorize your Fields
  • Hide items you don’t need
  • If you don’t need certain data, remove it…. For instance, if you have Date and Time together in one column, split Time out from the Date, and remove it.
  • Reduce the number of distinct values in a field as much as possible. For example if you have Date and Time together in one column, and you need both, split them out, and keep both. It will reduce the number of distinct values altogether and improve the efficiency of your model.
  • Fact Table – Large Tables that has relationships out to Dimensions
  • Dimension Table – These are Small tables (filter on these and it will improve the efficiency of your model)
  • Star Schema – Set your Fact Table in the middle, and your Dimension Tables around the Fact Table
  • Snowflake Schema – Multiple Fact Tables and Multiple Dimension Tables
  • Your Tables must flow to the Fact Table in a single direction. If the flow is away from your fact table, your data will not be accurate
  • Oversampling and/or Ambiguity occurs when you have a table relationship set to both, or bidirectional, instead of in a single direction. Do not set the relationship to both as it increases performance overhead and can cause confusion in the engine
  • Within Power BI take the time to Categorize the fields that can be categorized (Select Field > Column Tools > Data Category > Select what category it is)
  • Within Power BI, in the fields section, you may see summarized data that shouldnt be summarized. You will need to change Summarized Data in the Summarization dropdown, to Don’t Summarize, where it makes sense…such as in the Key field.

POWER QUERY – SETTING PARAMETERS

  • Power BI

To use parameters, which expecially helps when moving files from your local computer to the web service, perform the following

Open Power Query Editor
Click Home
Select Manage Parameters
Click New
Give it a Name (tacticalware)
Specify a Type from the drop down. For me I selected Text
In the Current Value field, specify the location of the csv file (C:\tacticalware\x.csv)
NOTE – it is case sensitive
Click Ok

Now go into your Advanced Editor
Find the location of the csv file (C:\tacticalware\x.csv)
Replace the path with the Name of the parameter (tacticalware)
So it will look like this:
Source = Csv.Document(File.Contents(tacticalware),……and so on
Click Done


POWER BI – QUERY FOLDING

  • Power BI

What is Power Bi Query Folding…..
– It reduces trips to the data source
– Pushes transformations to the data source
– It combines steps into a single statement that is sent to a data source
– Some operations may prevent query folding from happening
– It is supported by SQL Server
– Also supported by relational data sources

What it is NOT
– This is Not Available with all data sources

To see the steps, Enter into your Advanced Editor. It will show you the M Language here.

To view the SQL Server code that is generated:
In Power Query > Applied Steps section
Right click on a step, and select View Native Query
This will show you the SQL Server Code that will be sent back to the server for that particular step. However it does not sent the code back to SQL Server after each step. It sends it at the end when you Apply or Close & Apply

ADDING CUSTOM COLUMNS IN POWER BI

  • Power BI

I have been scraping Wikipedia for islands information, and building models in Power BI around them. One thing that I run into over and over is the lack of a certain field in each of the scrapes. The scraped don’t have the name of the State associated with the island names. So I will have to fix this by adding custom columns in Power BI / Power Query, so my models have better visuals. To do this you will need to perform the following:

Click Transform data to open Power Query Editor
Select Add Column from the Main Menu
Click Column From Examples
Select From All Columns
Enter in a value – for me I put in NH, and press Enter
Enter in your value a second time…for me it was placing NH in the second row, Now the rest of the rows should auto populate with the data (again for me NH showed in every subsequent row)
Click OK
Rename the leader from Literal, to State

You are done! Thanks for reading

POWER BI IMPORT VS DIRECT QUERY

  • Power BI

Import is taking a copy of a data from SQL server, and the copy is placed into your Power BI Desktop file

Direct Query leaves the data at the source and only pulls the data needed, when it is needed

CREATING A LOCAL MSSQL SERVER ON YOUR W10 PC

From time to time you will need to utilize a local sql server, for dev, testing, education, whatever. So here is a quick how-to on creating a local mssql server on your W10 pc.

Download and install the free version of SQL, called SQL Express:
https://www.microsoft.com/en-us/sql-server/sql-server-downloads
Accept all the defaults, except for these few
Use your credentials when prompted
Select all packages to be installed

Once SQL Express is installed, download and install SQL Server Management Studio
https://aka.ms/ssmsfullsetup

Now you have both installed, open SQL Server Management Studio or SSMS for short, and connect to your local SQL Express Database
Connect to “localhost\sqlexpress
You dont have to put in any credentials if you selected to use your credentials earlier.

To do a test on the database, try restoring the AdventureWorksDW database
Right click on Databases
Select Restore database
Select the AdventureWorksDW file
Click Ok

You can now connect into your database using Power BI or another tool, and start playing around.

Thanks for reading