Skip to content

365

Microsoft 365 Information, How-To’s, Tips, Tools, and Guides

HOW TO UPDATE FIREFOX TO THE LATEST VERSION

Quick how-to for updating Firefox with screenshots included.

Open Firefox

Click the hamburger icon (shown below) which is in the top right of your computer screen

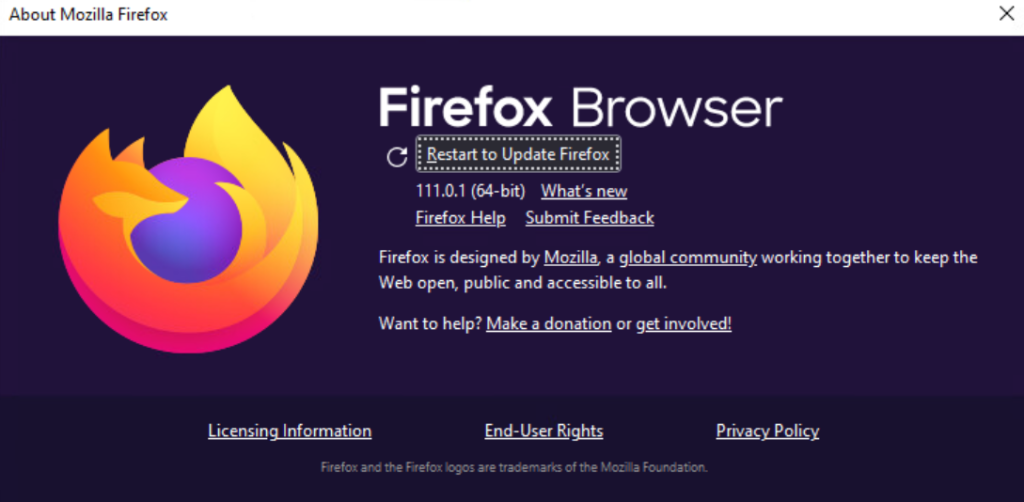
Click Help (shown below) then select About

If there is an update, it will show here, if the update is installed you will need to restart the browser as shown. And that is it!

INSTALL AND RUN CISA SCUBAGEAR

Quick How-To on installing and running the app

First – Get Global Administrator permissions to the M365 Tenant

Second – Open a browser and login into it using the newly created Global Administrator Account

Next Download SCuBAGear from – https://github.com/cisagov/ScubaGear

Open PowerShell as an Administrator (right click and select this) on the computer that you will run SCuBAGear from

cd C:\directory\ScubaGear-main\
To the directory you installed SCuBAGear

Type
Set-ExecutionPolicy Bypass

Type
Import-Module -Name .\PowerShell\ScubaGear

Type
.\SetUp.ps1

Type:
Disconnect-SCuBATenant

Type:
invoke-SCuBA

Login as your Global Admin account

The report will run!

EMAIL WARMING USING POWER AUTOMATE – SENDING FROM DOMAIN

For those of you who need to get a positive reputation on your domain for email campaigns, you first need to warm up the domain. Here is a simple power automate flow to assist with the task.

Login into Office.com

Click on the Menu to the Top Left of the screen

Select Power Automate

Click My Flows

Click +New Flow

Select Scheduled Cloud Flow

Give it a Name, Start Date, and Interval on how often you want it to run

Click Next

Click + Next Step

Type in mail and press Enter

Select Send EMAIL V3

Put in the FROM address of a user for the new domain you want to send email to
ex: user@tacticalware.com

Enter in a To Address for another email you own, that is off domain from the domain you are warming up.
ex: tacticalwarexyz123@gmail.com

Enter in a Subject

Add some Text to the Body

Click Save

Test your Flow, and email should go though now.

Next you will want to setup an auto reply on the receiving email address, and also setup a power automate flow from the email domain so you can generate content coming out of it.

EMAIL WARMING USING POWER AUTOMATE – SENDING TO DOMAIN

For those of you who need to get a positive reputation on your domain for email campaigns, you first need to warm up the domain. Here is a simple power automate flow to assist with the task.

Login into Office.com

Click on the Menu to the Top Left of the screen

Select Power Automate

Click My Flows

Click +New Flow

Select Scheduled Cloud Flow

Give it a Name, Start Date, and Interval on how often you want it to run

Click Next

Click + Next Step

Type in mail and press Enter

Select Send an Email V2

Put in the address of a user for the new domain you want to send email to
ex: user@tacticalware.com

Enter in a Subject

Add some Text to the Body

Click Save

Test your Flow, and email should go though now.

Next you will want to setup an auto reply on the receiving email address, and also setup a power automate flow from the email domain so you can generate content coming out of it.

CREATE DMARC RECORD

This is a quick how-to on setting up the record. If you want a more in-depth one, there are many available elsewhere. So for now, here it is

Login into your Email Server

Create a new email address. Something like dns@tacticalware.com

Next, Login into your DNS Provider
Ex – Network Solutions, Hostgator, ENOM

Navigate to the area to Manage DNS records

Create a TXT record

Name will be
_dmarc

Value will be:
v=DMARC1; p=reject; rua=mailto:dns@tacticalware.com; ruf=mailto:dns@tacticalware.com; fo=1;

Make sure you change dns@tacticalware.com to whatever the email address is that you created in the first step

Save the record

Go to MXToolbox.com and enter your domain name

You should see a green checkmark next to DMARC

BLOCK TRACKERS CONTAINED IN EMAIL – MICROSOFT OUTLOOK DESKTOP APPLICATION

Most marketing emails contain a single pixel hidden in the email which tracks you. This pixel calls home, lets the marketers/spammers know that you opened the email, and begins tracking your movement through their system.

Here is how to block it within Outlook on your IOS device (ipad, iphone, etc)

Open Outlook

Click on the File

Select Options

Open Trust Center

Click on Trust Center Settings

Find Automatic Download

Place check mark in:
Don’t download pictures automatically in standard html…..
Don’t download pictures in encrypted or signed…..

Thats it! Tracking pixel disabled

BLOCK TRACKERS CONTAINED IN EMAIL – IOS OUTLOOK

Most marketing emails contain a single pixel hidden in the email which tracks you. This pixel calls home, lets the marketers/spammers know that you opened the email, and begins tracking your movement through their system.

Here is how to block it within Outlook on your IOS device (ipad, iphone, etc)

Open Outlook

Click on the Avatar for you at the top left of the main screen

At the bottom left column you will see a gear. Click it

Find Mail Accounts

Click on your Office 365 Account / Google Account / Whatever you have for email

Find Block External Images

Turn it on

Thats it! Tracking pixel disabled

EXPORT ICLOUD CALENDAR and IMPORT INTO OUTLOOK

The time has come to remove your information from BIG TECH. This guide will show you how to get your data off of APPLE’s iCloud, so you can move it to Microsoft (who has largely, and wisely, stayed out of American Politics as of late)

First you will want to log into your iCloud account.
On your computer, open a Browser (not Chrome) and navigate to https://www.icloud.com/
Sign in
Click Calendar
On the left side, select the calendar you want to export
Click on the bars next to it
Select Public
Copy the web address. it will look something like this:
webcal://p51-caldav.icloud.com/published/2/MTExMjE4tJ9gcpOId08zbH1z8S88F_Baxte8C1b-UiaqdDNsmFL5
Open another browser window on your computer (Not Chrome)
Paste the following into the window:
webcal://p51-caldav.icloud.com/published/2/MTExMjE4tJ9gcpOId08zbH1z8S88F_Baxte8C1b-UiaqdDNsmFL5
And change the webcal text to https, so it looks like this:

Press Enter, and it will take some time, however your entire calendar will now be downloaded as an ics file

Make sure you do this for each of your calendars

To Import the data into Outlook
Open Outlook
Click File
Select Open & Export
Click Import Export
Choose Import and iCalendar (.ics) or vCalendar file (.vcs)
Click Next
Navigate to the directory where you downloaded the calendars to
Select a Calendar
Click OK
Choose Import
The calendar will import, and any errors that occur will be displayed
Once the import has completed, the dialog box will automatically close. So keep an eye on the success / failures during the import

Finally, it is time to clean up / delete your calendar from iCloud
Back to the iCloud Calendar page in your web browser
In the Calendar section to the left you will see the Edit link at the bottom
Select Edit
Then click the Red Circle next to each calendar that you want to delete, to remove it
Click Delete when prompted
Your calendar will now delete and your data will be safe from Apple moving forward

How To Upgrade From Office 365 to Microsoft 365

This is a quick how-to when it comes to upgrading your subscription.

Go to http://office.com

Login

Click the Admin link

Navigate to Billing on the left and select Products & Services

Click on your Office 365 Subscription, in my case it is Office 365 Business Premium

Select Upgrade from the menu at the bottom of the screen

Find the plan that works for you. For me it was Microsoft 365 Business

Click Upgrade

Select the Billing cycle (Monthly or Yearly)

Click Go to checkout

Verify your billing information

Click Place Order

Your order is now complete and you can proceed to setting up the new features