Skip to content
Home » ethereum

ethereum

Visit Tacticalware.com for information related to this tag and others. We look forward to assisting in your tech projects with our in-depth knowledgebase…

PAYPAL CRYPTO – CONVERTING CASH TO BITCOIN

  • Crypto

Recently Paypal has launched their crypto system, allowing you to purchase and sell crypto. Here is the rundown on how to do it, and what it does not do when converting cash to bitcoin, ethereum, litecoin and others

To convert cash to Bitcoin
Open a browser and navigate to https://www.paypal.com
Login to your Paypal account

Side Note:
Make sure your Paypal account is connected to your checking account already.. If it is not, you will have to do this

Once logged into Paypal, click on the Crypto button at the top right
Click BUY next to Bitcoin
Select the Big Blue Buy button at the center again

Side Note:
If this is your first time buying crypto with Paypal you will need to Confirm some extra info before you buy

Next you will put your amount listed in USD, into the Paypal window
Paypal will also add their Fees on top of the amount you specified
Click Confirm, and your crypto will be purchased with Paypal.

You now own crypto

Now for my issues with it
1. Paypal does not let you transfer your crypto out. They hold your crypto, and you hostage to their HUGE fees.

2. You do not have control over your crypto. They get hacked, you lose your crypto. You can do nothing about it

3.They show a chart that says Bitcoin is $59,133, however when you go to sell it, they immediately take roughly half a percent off. So in trying to sell it you see Bitcoin is $58,823. Cancel out of that screen, and Bitcoin is magically back at $59,151. Go back into the sell screen and your half a percent or so is gone again. Over and over I did this, and over and over the spread didn’t make sense.

4. When selling you also have to pay a large paypal fee

5. Then to transfer your cash back into your account, you pay another 1%

All in all, on a $10,200 transaction, I paid $410.33 in fees immediately and will be hit by the other 1% when it goes to my bank. Bitcoin did not decrease in price either during my 10 minute test. It actually increased in value around $80.

INCREASE ETH / ETC MINING BY 50% IN 2021 USING OHGODANETHLARGEMENTPILL-R2

If you are still using an NVidia 1080 Ti card, and are trying to compete with the 2080s and 3090s these days, you need to up your hash game. There has been a tool around for the past 2 years to help with this. It is specifically designed for teh 1080 Ti cards, and has increased my hashes in the area of 50% per card. I wanted to preserve the software on github, so I created my own fork of it. The fork will not be updated, or worked on by me. It is just there so we all have a place to draw from in the long run.

For my setup, I am running Ubuntu 20.04.01, headless, and an Nvidia 1080ti. My miner is T-Rex with the setup from this guide:
https://tacticalware.com/ubuntu-20-04-etc-mining-after-epoch-390-november-2020/

Back to the guide

On your miner, open a terminal
sudo bash
cd /tacticalware
git clone https://github.com/tacticalware/ETHlargementPill.git
mv ETHlargementPill/ ohgod
cd ohgod
chmod +x OhGodAnETHlargementPill-r2
screen ./OhGodAnETHlargementPill-r2

You will see the following message:


Your system is now capable of running at 50% greater speed.

Since you used screen you can close this connection and it will still run.
To reconnect to this screen you can resume it by opening a terminal again
Typing sudo bash
Then screen -r

All that is left is to start up your mining software, configure it to mine ETH or ETC and start mining.

Enjoy the extra hashes!

The hardware that I used in this guide:
Gigabyte AORUS GeForce GTX 1080 Ti (QTY 6):
https://amzn.to/2JqvXC8

Motherboard (QTY 1): 
https://amzn.to/2JqGJZ7

CPU (QTY 1): 
https://amzn.to/3qevp2X

Memory (QTY 1): 
https://amzn.to/2JqHn8Z

Hard Drive (QTY 1):  
https://amzn.to/3lic3X5

Risers (QTY 6):  
https://amzn.to/33rIgVE

Power Supplies (QTY 2):
https://amzn.to/3fTRpLR

Add2PSU (QTY 1):
https://amzn.to/39s4URY

Power Switch (QTY 1):  
https://amzn.to/3ljmNVk


WINDOWS 10 MINING ETC AFTER EPOCH 390 [NOVEMBER 2020]

This is a quick guide on how to use T-Rex on your Windows 10 computer to allow your NVidia 1080 Ti cards to run after the epoch. Ethereum Classic has a hardform at Epoch 390 which should fall on or around November 28th 2020. To keep mining afterwards you will have to update your miner to one that supports the new fork. For this, I have chosen to switch over to T-Rex.

On my Windows computer:
Open a web browser
Navigate to
https://github.com/trexminer/T-Rex/releases

Download
https://github.com/trexminer/T-Rex/releases/download/0.18.11/t-rex-0.18.11-win-cuda10.0.zip

Unzip t-rex-0.18.11….

Your Antivirus will probably send you a warning, so you will have to create an exception for it.

Now right click on the .bat file you want to run. For me, I will be mining ETC, so I will right click on ETC-2miners.bat

Once the file is open, I will save it as Tacticalware.bat

Next you will want to change the mining pool to whichever one you use. I use ethermine

You will want to modify the wallet address that shows in the file, and replace it with your wallet address

At the end of the changes, my file looks like this:
t-rex.exe -a ethash –coin etc -o stratum+tcp://us1-etc.ethermine.org:4444 -u 0xb2bc70cD85e20c96c8967CAECcE20a238ee9950D -w tacticalware –fork-at etchash=epoch:390

pause


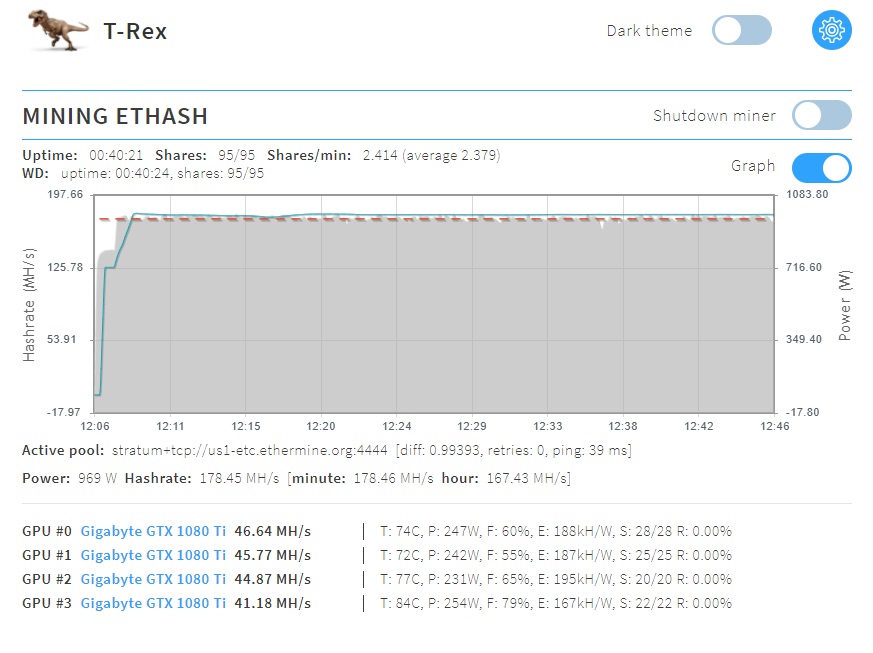
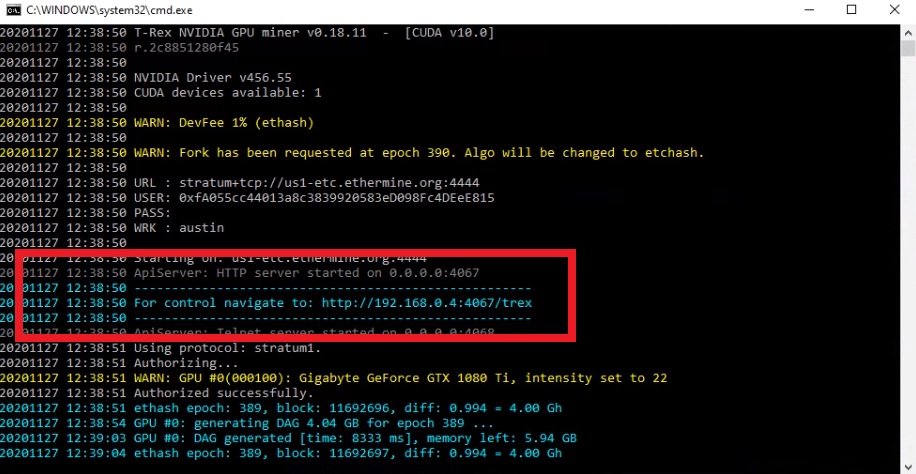
Save the file, and then run it. You can monitor the progress by navigating watching your hashes on the ethermine site, or navigate to the local t-rex site that is created on your computer.

The address will look something like this, and be displayed when you begin mining
t-rex


When you browse to that site you will see something that looks like this:

t-rex

You can now monitor your mining rig through a browser

Thanks for reading

The hardware that I used in this guide:
Gigabyte AORUS GeForce GTX 1080 Ti (QTY 4):
https://amzn.to/2JqvXC8

Motherboard (QTY 1): 
https://amzn.to/2JqGJZ7

CPU (QTY 1): 
https://amzn.to/3qevp2X

Memory (QTY 1): 
https://amzn.to/2JqHn8Z

Hard Drive (QTY 1):  
https://amzn.to/3nZ5pH4

Risers (QTY 4):  
https://amzn.to/33rIgVE

Power Supplies (QTY 2):
https://amzn.to/3fTRpLR

Add2PSU (QTY 1):
https://amzn.to/39s4URY

Power Switch (QTY 1):  
https://amzn.to/3ljmNVk


Ethereum Classic Mining with NVidia 1080Ti and Ubuntu 18.04.03

If you need help setting up the rig, you can view one of my other articles on building the rig, adding the cards, installing the drivers and so on. This guide will help you from the point that the rig is built and you have an Ethereum Classic wallet already available.

Open a terminal

mkdir /drivers && mkdir /drivers/claymore && mkdir claymore15

cd /drivers/claymore

wget

tar zxvf *

cd “C and hit the tab key to populate the rest of the name

Press Enter

mv ./* ../claymore15

cd ../

rm -R “C and hit the tab key

Press Enter

rm *z

cd claymore15

wget https://tacticalware.com/downloads/etc.txt

mv etc.txt etc.sh

chmod +x etc.sh

nano etc.sh

Change the wallet address to your wallet

Save the file and Exit

./etc.sh

And you off and mining!

The hardware that I used in this guide:
Gigabyte AORUS GeForce GTX 1080 Ti (QTY 6):
https://amzn.to/2JqvXC8

Motherboard (QTY 1): 
https://amzn.to/2JqGJZ7

CPU (QTY 1): 
https://amzn.to/3qevp2X

Memory (QTY 1): 
https://amzn.to/2JqHn8Z

Hard Drive (QTY 1):  
https://amzn.to/3lic3X5

Risers (QTY 6):  
https://amzn.to/33rIgVE

Power Supplies (QTY 2):
https://amzn.to/3fTRpLR

Add2PSU (QTY 1):
https://amzn.to/39s4URY

Power Switch (QTY 1):  
https://amzn.to/3ljmNVk

ZMap and ZGrab Installation

Installing the packages on a Ubuntu 18.04 system

In the coming weeks I will be writing more about how to check the perimeter of your network, understand what data is leaking out from it, and how to safeguard your network, and especially your wallet from bad actors. These tools are the beginning, I will wrap it altogether piece by piece.

Log into your Ubuntu rig

Install zmap and zgrab

sudo bash

apt install zmap

apt install golang-go

go get github.com/zmap/zgrab

cd /home/USERNAME/go/src/github.com/zmap/zgrab

go build

Test it by running the following from a remote system, against your network

zmap -p 30303 (Your Public IP Here) –output-fields=* –output-file=results.csv | zgrab –port 30303 -banners –output-file=banners.json