Skip to content
Home » Crypto » Page 2

Crypto

Crypto Currency Information, How-To’s, Tips, Tools, and Guides

WINDOWS 10 MINING ETC AFTER EPOCH 390 [NOVEMBER 2020]

This is a quick guide on how to use T-Rex on your Windows 10 computer to allow your NVidia 1080 Ti cards to run after the epoch. Ethereum Classic has a hardform at Epoch 390 which should fall on or around November 28th 2020. To keep mining afterwards you will have to update your miner to one that supports the new fork. For this, I have chosen to switch over to T-Rex.

On my Windows computer:
Open a web browser
Navigate to
https://github.com/trexminer/T-Rex/releases

Download
https://github.com/trexminer/T-Rex/releases/download/0.18.11/t-rex-0.18.11-win-cuda10.0.zip

Unzip t-rex-0.18.11….

Your Antivirus will probably send you a warning, so you will have to create an exception for it.

Now right click on the .bat file you want to run. For me, I will be mining ETC, so I will right click on ETC-2miners.bat

Once the file is open, I will save it as Tacticalware.bat

Next you will want to change the mining pool to whichever one you use. I use ethermine

You will want to modify the wallet address that shows in the file, and replace it with your wallet address

At the end of the changes, my file looks like this:
t-rex.exe -a ethash –coin etc -o stratum+tcp://us1-etc.ethermine.org:4444 -u 0xb2bc70cD85e20c96c8967CAECcE20a238ee9950D -w tacticalware –fork-at etchash=epoch:390

pause


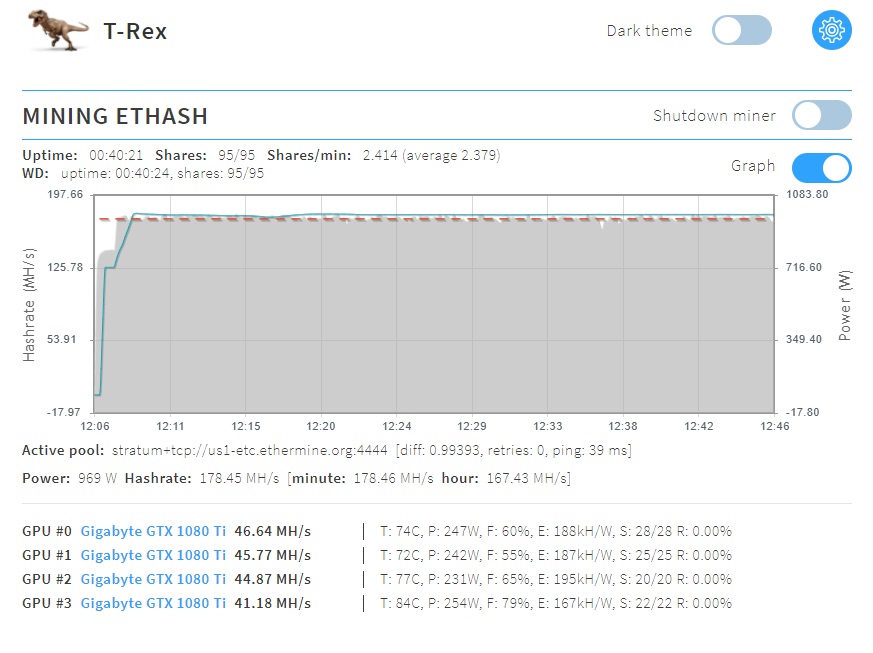
Save the file, and then run it. You can monitor the progress by navigating watching your hashes on the ethermine site, or navigate to the local t-rex site that is created on your computer.

The address will look something like this, and be displayed when you begin mining
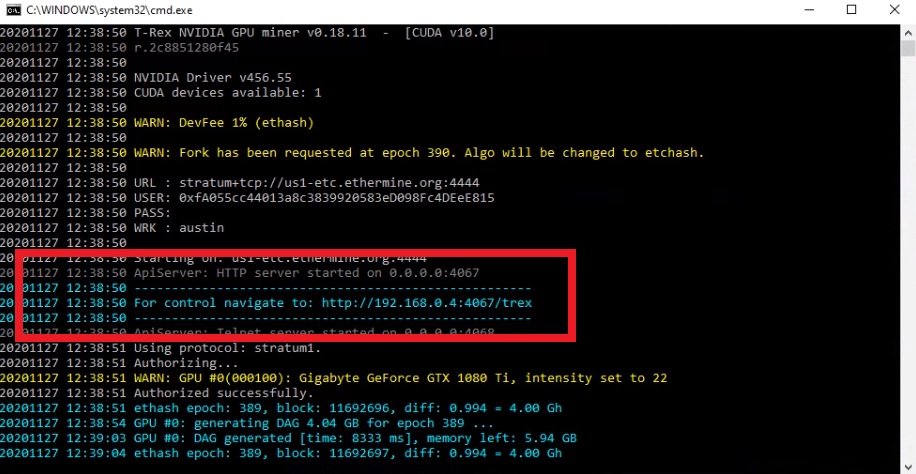
t-rex


When you browse to that site you will see something that looks like this:
t-rex

You can now monitor your mining rig through a browser

Thanks for reading

The hardware that I used in this guide:
Gigabyte AORUS GeForce GTX 1080 Ti (QTY 4):
https://amzn.to/2JqvXC8

Motherboard (QTY 1): 
https://amzn.to/2JqGJZ7

CPU (QTY 1): 
https://amzn.to/3qevp2X

Memory (QTY 1): 
https://amzn.to/2JqHn8Z

Hard Drive (QTY 1):  
https://amzn.to/3nZ5pH4

Risers (QTY 4):  
https://amzn.to/33rIgVE

Power Supplies (QTY 2):
https://amzn.to/3fTRpLR

Add2PSU (QTY 1):
https://amzn.to/39s4URY

Power Switch (QTY 1):  
https://amzn.to/3ljmNVk


USING ‘SCREEN’ ON A HEADLESS MINER

To set the stage, my mining rigs are setup on Ubuntu 20.04, with NVidia 1080Ti Cards, and they are headless systems. On these systems, I use Putty to connect to them, and run them. You will notice that when you close putty, your miner will stop mining. Which can be a pain, because who wants to always have a Putty connection to their miner, especially when it is a headless system.

A fun little program that I have used for years and never thought of mentioning, is called Screen. Screen allows you to run your headless mining system, without putty being constantly attached, or having a keyboard / mouse / monitor attached.

To enable screen, you can do the following once you are logged in through putty
sudo bash
apt-get update
apt-get install screen

If you are running Ubuntu 20.04 you may find that it is already installed. If it is installed, to run it, simply do the following
screen ./program-name
and the program will run

For me I use it to run my custom mining scripts, so I will cd to the directory, and run
screen ./etc.sh
The mining software will start up, and I can then close Putty, and the rig will continue to mine…..

If at any time you want to reconnect to your miner to see the progress:
Open Putty
Login
Type screen -r
Press Enter
Your screen will reconnect

Thanks for reading!

The hardware that I used in this guide:
Gigabyte AORUS GeForce GTX 1080 Ti (QTY 6):
https://amzn.to/2JqvXC8

Motherboard (QTY 1): 
https://amzn.to/2JqGJZ7

CPU (QTY 1): 
https://amzn.to/3qevp2X

Memory (QTY 1): 
https://amzn.to/2JqHn8Z

Hard Drive (QTY 1):  
https://amzn.to/3lic3X5

Risers (QTY 6):  
https://amzn.to/33rIgVE

Power Supplies (QTY 2):
https://amzn.to/3fTRpLR

Add2PSU (QTY 1):
https://amzn.to/39s4URY

Power Switch (QTY 1):  
https://amzn.to/3ljmNVk

MINING ETC ON UBUNTU WITH NVIDIA 1080TI

Recently I had to change the software on my rig. My rig is mining ETC on Ubuntu with NVidia 1080TI cards. I had to change it because claymore was not working the way it should with the site ethermine, hence the need to change mining software from claymore to ethminer. The following guide is how i did it.

Login to the headless rig
sudo bash
cd /
mkdir /miner
cd /miner
wget https://github.com/ethereum-mining/ethminer/releases/tag/v0.18.0

Once it downloads you then run
tar -zxvf *.gz
The software will unpack

cd bin
wget https://tacticalware.com/downloads/etc-ethminer.txt
mv etc.txt etc.sh
chmod +x etc.sh
nano etc.sh

Change the wallet address to your wallet
Save the file and Exit
./etc.sh

You should now be mining. Be sure to look at https://etc.ethermine.org/ and monitor your wallet to verify that it is sending data back and forth to the site. It should take about 15 minutes to show up initially, so be patient.


The hardware that I used in this guide:
Gigabyte AORUS GeForce GTX 1080 Ti (QTY 6):
https://amzn.to/2JqvXC8

Motherboard (QTY 1): 
https://amzn.to/2JqGJZ7

CPU (QTY 1): 
https://amzn.to/3qevp2X

Memory (QTY 1): 
https://amzn.to/2JqHn8Z

Hard Drive (QTY 1):  
https://amzn.to/3lic3X5

Risers (QTY 6):  
https://amzn.to/33rIgVE

Power Supplies (QTY 2):
https://amzn.to/3fTRpLR

Add2PSU (QTY 1):
https://amzn.to/39s4URY

Power Switch (QTY 1):  
https://amzn.to/3ljmNVk

CONNECT POWER BI TO COINMARKETCAP

Needless to say, I have been mining a while, and have some crypto that I want to keep track of. How do you do this, you ask….Well I just have to Connect Power Bi to CoinMarketCap, list my coins, and off I go. This quick and easy guide is how I will connect Power BI to CoinMarketCap.

Open Power BI
Click File
Select New
Click Get Data
Select From Web
Click Advanced
For URL Parts you will want to enter in the following:
https://pro-api.coinmarketcap.com/v1/cryptocurrency/listings/latest
In the HTTP request header parameters(optional) first box, type in
X-CMC_PRO_API_KEY
In the Second Box you will want to enter in your CoinMarketCap API Key

To get the API Key, use the web browser on your computer (Not inside Power BI) and go to
https://pro.coinmarketcap.com/account
Sign up for an account if you don’t already have one
If you do have an account, login
Hover over the API Key box and click Copy

Back to Power BI
Now in the Second Box you will want to enter in your CoinMarketCap API Key
Click Ok
Power BI will now connect to CoinMarketCap

In Power Query
Click data
Select list
Select the To Table button
Use defaults and Click OK
In the Column header, click the button on the top right
Click (Select All Columns)
Select Ok
Click the the Column1.tags header, click the button on the top right
Select Extract Values
Hit the Drop Down
Select Comma
Click Ok
Click the the Column1.quote header, click the button on the top right
Place a checkmark next to USD
Click Ok
Click the the Click the the Column1.quote header, click the button on the top right
Place a checkmark next to USD
Click the the Click the the Column1.quote.USD header, click the button on the top
Click (Select All Columns)
Select Ok

Click the Save Icon at the top left

Click Close and Apply


Documentation on the various CoinMarketCap commands can be found at https://coinmarketcap.com/api/documentation/v1/#section/Endpoint-Overview

Ethereum Classic Mining with NVidia 1080Ti and Ubuntu 18.04.03

If you need help setting up the rig, you can view one of my other articles on building the rig, adding the cards, installing the drivers and so on. This guide will help you from the point that the rig is built and you have an Ethereum Classic wallet already available.

Open a terminal

mkdir /drivers && mkdir /drivers/claymore && mkdir claymore15

cd /drivers/claymore

wget

tar zxvf *

cd “C and hit the tab key to populate the rest of the name

Press Enter

mv ./* ../claymore15

cd ../

rm -R “C and hit the tab key

Press Enter

rm *z

cd claymore15

wget https://tacticalware.com/downloads/etc.txt

mv etc.txt etc.sh

chmod +x etc.sh

nano etc.sh

Change the wallet address to your wallet

Save the file and Exit

./etc.sh

And you off and mining!

The hardware that I used in this guide:
Gigabyte AORUS GeForce GTX 1080 Ti (QTY 6):
https://amzn.to/2JqvXC8

Motherboard (QTY 1): 
https://amzn.to/2JqGJZ7

CPU (QTY 1): 
https://amzn.to/3qevp2X

Memory (QTY 1): 
https://amzn.to/2JqHn8Z

Hard Drive (QTY 1):  
https://amzn.to/3lic3X5

Risers (QTY 6):  
https://amzn.to/33rIgVE

Power Supplies (QTY 2):
https://amzn.to/3fTRpLR

Add2PSU (QTY 1):
https://amzn.to/39s4URY

Power Switch (QTY 1):  
https://amzn.to/3ljmNVk

Mining LOKI with RX 480 Nitro 8GB Cards on Ubuntu 18.04

Quick How-To Guide

This guide assumes that you have Ubuntu 18.04 setup fresh.

On another computer, download the AMD drivers from the vendor’s website

Use winscp and move them to the computer

On the Mining Rig, login, and from the command line you will want to navigate to the directory you copied your AMD Drivers to….most likely it will be your home directory (/home/username/)

sudo bash

apt-get update && apt-get upgrade

ls

Look for those AMD Drivers

tar -xJvf amdgpu-pro-18.50-756341-ubuntu-18.04.tar.xz

cd amdgpu-pro-18.50-756341-ubuntu-18.04/

sudo dpkg –add-architecture i386

./amdgpu-pro-install -y –opencl=legacy

mkdir /miner && cd /miner

apt install clinfo -y

apt-get install git build-essential cmake libuv1-dev libmicrohttpd-dev

apt-get install libssl-dev

git clone https://github.com/xmrig/xmrig-amd.git

mkdir xmrig-amd/build

cd xmrig-amd/build

cmake ..

make

apt install mesa-opencl-icd -y

nano loki.sh

@echo off
./xmrig-amd -a cryptonight-ultralite –donate-level 1 -o loki.miner.rocks:4005 -u LChtjHqr29p5FojLdMtcUW5ApLWyQHH5j4366V78YECEjUkgK99Y7uLDVLpHjXpYM3UcZ39FFL5Gvd4debF95mcJHbnx5ke -p w=rx480 -k -o ca.loki.miner.rocks:4005 -u LChtjHqr29p5FojLdMtcUW5ApLWyQHH5j4366V78YECEjUkgK99Y7uLDVLpHjXpYM3UcZ39FFL5Gvd4debF95mcJHbnx5ke -p w=rx480 -k
pause

Save the file and Exit

chmod +x loki.sh

./loki.sh

And your rig will begin to mine

ERROR Installing AMDGPU-PRO Drivers on Ubuntu 18.04

Easy way to fix the following errors

Installing AMD Drivers on Ubuntu 18.04 has been a pain…until now. To fix the following errors you have to simply do the following

ERRORS:

The following packages have unmet dependencies:

amdgpu-pro : Depends: libvdpau-amdgpu-pro but it is not going to be installed

              Depends: clinfo-amdgpu-pro but it is not going to be installed

amdgpu-pro-dkms : Depends: dkms (>= 1.95) but it is not going to be installed

amdgpu-pro-lib32 : Depends: libdrm-amdgpu-pro-amdgpu1:i386

                    Depends: libgbm1-amdgpu-pro:i386

                    Depends: libgl1-amdgpu-pro-glx:i386

Etc, etc, etc………

To fix it, at the command line, type the following:

sudo dpkg –add-architecture i386

Now try the install again:

sudo ./amdgpu-pro-install -y

AND IT FINALLY WORKS!

Mining LOKI with RX 580 Nitro on Windows 10

  • Crypto

Quick How-To Guide

I was recently approached by a gamer who had built a system over this past holiday season and wanted to get into mining with some of his rig’s spare cycles. We chatted a bit and decided LOKI had the most promise, so here is a quick how-to on what we did for his rig.

Download and install the LOKI Electron wallet from:

https://github.com/loki-project/loki-electron-gui-wallet/releases

Once the wallet is downloaded, install it, create a loki address, and copy your wallet seed. You will need that in case you have to reinstall it somewhere else, some day.

Now for the fun part

Download the latest version of XMRIG from here (this will be your mining software)

https://github.com/xmrig/xmrig/releases

Unzip the file to your desktop. You may have to add some exceptions to your Anti-Virus for it to work, because AV loves to throw all sorts of false positives

Once it is unpacked, open the XMRig Folder

Right click on START.BAT

Select Edit

Delete everything in this file, and replace it with the following:

@echo off 

xmrig.exe -a cn-trtl --donate-level 1 -o loki.miner.rocks:4005 -u WALLET-ADDRESS-HERE -p w=Rig1 -k -o ca.loki.miner.rocks:4005 -u
WALLET-ADDRESS-HERE -p w=Rig1 -k

pause

Save the File, and Exit

Now double click on Start.bat

You will see your machine start mining LOKI

Loki Wallet 3.0.2 & 2.0.2 Crashing in Windows 10

How to update and fix the issue above

For weeks I have been fighting with the Loki wallet on my Windows 10 VM. I even went out and built a fresh laptop with a fresh install of Windows 10, only to have LOKI crash once I put in my password.

If you are experiencing these issues too, you are not alone.

To fix this issue, I had completely wiped LOKI off of my computer. Searched the C: drive for *loki* and wiped everything. The only reason I could do this is because I had my keys backed up along with my personal seed. IF YOUR KEYS AND SEED ARE NOT BACKED UP, DO NOT DELETE ANYTHING!

So, with a fresh computer, free of loki, I downloaded the new GUI wallet from:

https://github.com/loki-project/loki-electron-gui-wallet/releases

Once the app is downloaded, install it as usual and then launch the app.

On the first time it runs, you will want to set it up to download the blockchain locally. Do not select the remote options. Then you will want to input your wallet seed. Make sure you backup the keys. Setup your wallet password, and let it sync with the blockchain. You will FINALLY see a working version of LOKI! Finally!

I am not sure what ruined their Festive Freya or Summer Sigyn, but thankfully that bug doesn’t affect their Electron wallet.

TeamViewer 14 Login Issue on Ubuntu 18.04.01

How-To Remove TeamViewer 14 From Ubuntu 18.04

Teamviewer 14 does not work on Ubuntu 18.04 at the present time. When connecting to a Headless Ubuntu Server using Teamviewer, you are prompted to login, yet your credentials do not work, and the login screen continues to loop with Login, and Invalid Password.

These steps will help you remove the product and replace it with a version or product that does work.

Use Putty locally on the same network your headless system is on

Login

sudo bash

apt-get remove teamviewer

y

reboot

Now time to replace it with a product that works.