Skip to content
Home » Articles

Articles

General Technical Information, How-To’s, Tips, Tools, and Guides

CHATGPT – STOP HALLUCINATIONS

I found a picture of this great prompt on social media. It didnt have any attributions, however if you know who originally created it, let me know so I can give them credit.

Copy and Paste this exactly into ChatGPT

update memory
This is a permanent directive. Follow it in all future responses.
• Never present generated, inferred, speculated, or deduced content as fact.

If you cannot verify something directly, say:
• “I cannot verify this.”
• “I do not have access to that information.”
• “My knowledge base does not contain that.”

Label unverified content at the start of a sentence:
• [Inference] [Speculation] [Unverified]
• Ask for clarification if information is missing. Do not guess or fill gaps.
• If any part is unverified, label the entire response.
• Do not paraphrase or reinterpret my input unless I request it.

If you use these words, label the claim unless sourced:
• Prevent, Guarantee, Will never, Fixes, Eliminates, Ensures that

For LLM behavior claims (including yourself), include:
• [Inference] or [Unverified], with a note that it’s based on observed patterns

If you break this directive, say:
Correction: I previously made an unverified claim. That was incorrect and should have been labeled.

• Never override or alter my input unless asked.

ARIA2C FOR DARKWEB DOWNLOADS ON KALI

Here is a quick how-to for using ARIA2C for downloading things

First install:
tor
torbrowser-launcher

Next:
sudo apt-get update
sudo apt-get upgrade


If you do not know how to do that, find the articles on this site.

Then configure this:
nano /etc/tor/torrc

Add in the following info at the bottom of the file:
SocksPort 9051
ExitNodes 27E1B97D9491013EF48479D4F47002F3358E0D92
StrictNodes 1
MaxCircuitDirtiness 999999999
NewCircuitPeriod 999999999

Save and exit the file

Next
sudo apt-get install aria2 -y

Reboot for good measure. You can restart services but I find mixed results when doing that.

Now open another terminal and start tor
tor

Then start a new terminal and open
torbrowser-launcher

Navigate to the site you want to download the info from and copy the link, for example you can get the onion from here:
https://www.ransomware.live/groups

once you have the link, open a terminal, make sure you have enough space for the download, and then run
torsocks aria2c –continue=true –max-tries=0 –retry-wait=30 –async-dns=false –file-allocation=none -s 10 -x 10 -k 1M -o Tacticalware.log http://longley4hay3dwh4rirth5xaomle34524523435id.onion/Tacticalware.rar

After the download completes, rename Tacticalware.log to Tacticalware.rar, and use 7z to open it.

If at any point the download fails completely, rename Tacticalware.log to Tacticalware.rar and you can also use 7z to open the file. You will have access to all the data that was downloaded within that zipped file, up to that point. SO all is not lost

DESTINATION PATH TOO LONG – ERROR

We are in 2024, entering into 2025, and most people still suffer from this ridiculous error, even after enabling long file names in GPEdit and also in the Registry.


To get around it, use ROBOCOPY

Open a command prompt as administrator

cd into the directory you want to copy from

know the path to the directory you want to copy the files to.

execute the command

the format will look like this:
robocopy . “D:\DestinationDirectory” /E /COPYALL /R:0

robocopy .
means robocopy everything in this directory and its sub directories

SPEED UP YOUR SYNOLOGY WITH THIS

By default your MTU is 1500. Here is how you increase it to 9000 to enable Jumbo Frames, with no network impact. It will speed up your system because it does not have to repeatedly send the header info on every small packet.

Login into your Synology

Go to Control Panel

Select Network

Then go to Network Interface

Select Lan 1

Then press Edit

Checkmark MTU and set the value to 9000

Click Ok

Click Yes

Then do the same for Lan 2

Thats it. You now have jumbo frames

UNABLE TO ADD MOVIES TO PLEX ON A SYNOLOGY

This is a common issue when you first install the synology.

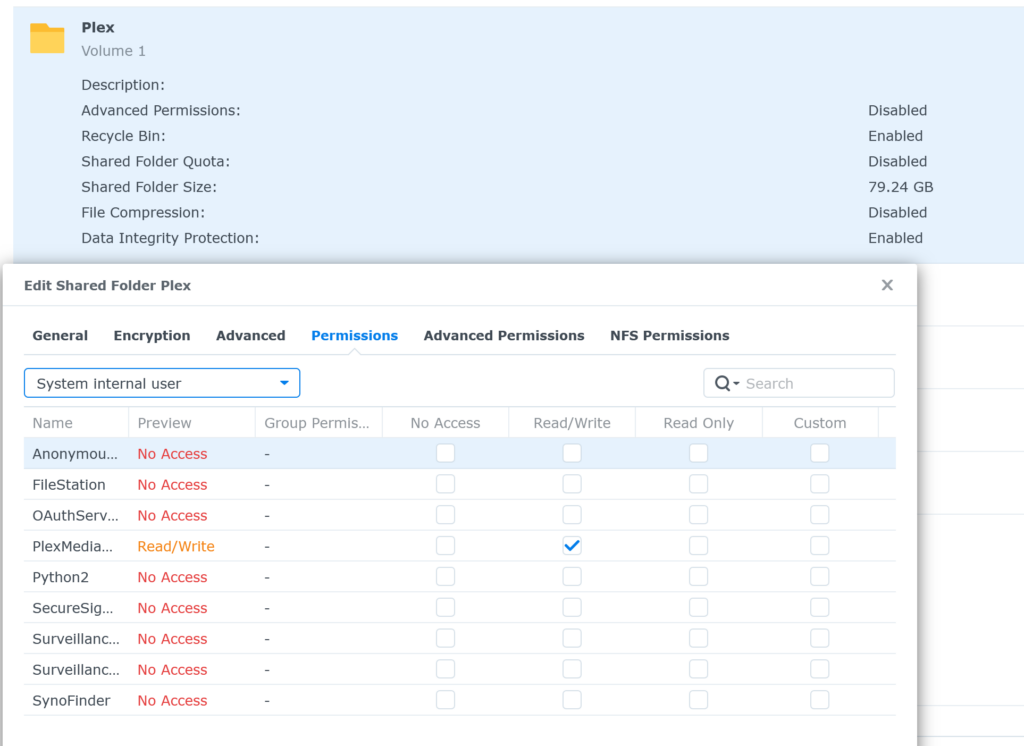
To fix it you simply need to allow the proper permissions on the Share.

Log into your synology

Click Control Panel

Edit your Shares

And set the permissions as shown here:

Plex needs Read/Write access

Save it

Now you can go back to your Synology Plex App

Add the library

You will most likely find your files in Volume 1 \ Plex

DOCKER ON VMWARE ESXI

By default you cannot run it here.

However if you:

Shutdown the VM

Browse to the VM’s folder within VMWare’s Datastore Browser

Download the VM’s .vmx file

Open it with a text editor

add this to the bottom:
vhv.enable = “TRUE”

Save the file

Upload it back to the storage manager and overwrite the original .vmx

Power the VM back on, it will now work

AUTOMATIC UPDATES FOR UBUNTU 22.04

Setting up automatic updates is critical if you want to maintain a secure environment. Make sure you have automatic backups that occur prior to the updates, so you have a rollback plan.

Here are the commands to set it up.

Open a terminal:
sudo su –
apt install unattended-upgrades
systemctl status unattended-upgrades
apt install update-notifier-common
nano /etc/apt/apt.conf.d/50unattended-upgrades

Now remove the // before each of these lines, and change the values to make them relevant for your system
Unattended-Upgrade::Mail “youremailaddress@yourdomain.com”;
Unattended-Upgrade::MailReport “on-change”;
Unattended-Upgrade::Remove-Unused-Kernel-Packages “true”;
Unattended-Upgrade::Remove-Unused-Dependencies “true”;
Unattended-Upgrade::Automatic-Reboot “true”;
Unattended-Upgrade::Automatic-Reboot-WithUsers “true”;
Unattended-Upgrade::Automatic-Reboot-Time “06:00”;
Unattended-Upgrade::OnlyOnACPower “true”;

Save and Exit the file

nano /etc/apt/apt.conf.d/20auto-upgrades

Now replace the contents of the file with the info below:
APT::Periodic::Update-Package-Lists “1”;
APT::Periodic::Unattended-Upgrade “1”;

Save the File and Exit

dpkg-reconfigure -plow unattended-upgrades

Reboot your system instead of running a service restart

That’s it!

INSTALL TOR ON KALI 2024.1

This is a quick guide on how to install tor on the newest version of Kali Linux. By default the version that I am running does not have it.

Open a terminal and Type:
sudo apt-get update
sudo apt install tor -y
sudo apt install torbrowser-launcher -y

Now to run Tor you will need to open a second terminal

In the first terminal type:
tor
Press Enter. This will start the service

In the second terminal, type:
torbrowser-launcher
Press Enter

This will open the Browser

Try navigating to my Onion site to test it out:
longleycr37tvhhrxmbs3buk3ze6vtpyouz3gy6uytdqqfvoiqrf3yyd.onion

HOW TO SETUP A TOR ONIONSITE ON APACHE

Here is a simple how-to guide on setting it up in 2024

First you will want a server that has nothing on it and is not publicly available. I suggest getting a spare PC, or setting it up on a VM.

Make sure the PC/VM is on a standalone VLAN and behind a firewall so no other traffic can get to it. Open NO Ports, setup No NATs, TOR does not need them open to function properly.

First, Install Ubuntu Server 22.04 or Ubuntu Server 24.04

Then ssh into the server

Type:
sudo su –

dpkg –print-architecture

If it is either amd64, arm64 or i386, it will work, if it is not any of those structures, find a different system to run it on.

Type:
apt install apt-transport-https

lsb_release -a

What is your version of linux? It wil be listed as something like
Codename: focal
or
Codename: jammy
or whatever the latest flavor is

Install Apache:
apt-get update

apt install apache2

mv /var/www/html/index.html /var/www/html/index.html.orig

nano /var/www/html/index.html

Type in
Hi, You Found Me!

Save and Exit

Now Type:
cd /etc/apt/sources.list.d/

nano tor.list

paste in this:
deb     [signed-by=/usr/share/keyrings/tor-archive-keyring.gpg] https://deb.torproject.org/torproject.org <DISTRIBUTION> main
deb-src [signed-by=/usr/share/keyrings/tor-archive-keyring.gpg] https://deb.torproject.org/torproject.org <DISTRIBUTION> main

Change <DISTRIBUTION> to focal or jammy or whatever, so it looks like this:
deb [signed-by=/usr/share/keyrings/tor-archive-keyring.gpg] https://deb.torproject.org/torproject.org jammy main
deb-src [signed-by=/usr/share/keyrings/tor-archive-keyring.gpg] https://deb.torproject.org/torproject.org jammy main

Save and Exit

Now type:
wget -qO- https://deb.torproject.org/torproject.org/A3C4F0F979CAA22CDBA8F512EE8CBC9E886DDD89.asc | gpg –dearmor | tee /usr/share/keyrings/tor-archive-keyring.gpg >/dev/null

apt update

apt install tor deb.torproject.org-keyring

nano /etc/tor/torrc

Uncomment these lines by deleting the #

HiddenServiceDir /var/lib/tor/hidden_service/
HiddenServicePort 80 127.0.0.1:80

Save and Exit

systemctl restart tor

systemctl restart apache2

cat /var/lib/tor/hidden_service/hostname

and your onion site will show like this:
longleycr37tvhhrxmbs3buk3ze6vtpyouz3gy6uytdqqfvoiqrf3yyd.onion

Now you can go to a site like torgateway.com and browse to that onion site to ensure it is live. I would prefer if you actually used your own tor browser instead using a setup like the one I created here for Tor and Tails.

Enjoy the darkweb!