Skip to content
Home » pla

pla

Visit Tacticalware.com for information related to this tag and others. We look forward to assisting in your tech projects with our in-depth knowledgebase…

SIMPLIFY3D SETTINGS FOR A DIRECT DRIVE ENDER 3 PRO USING eSUN PLA+ BLACK

I am in the process of putting together several posts, which detail my printer hardware, along with giving you a copy of my FFF profile for that setup. For this post I am using Simplify3D to Slice eSUN’s PLA+ in Black, on a Creality Ender 3 Pro with a Direct Drive setup, using a Micro Swiss Hotend.

Slicer Profile can be downloaded here:
https://tacticalware.com/downloads/Tacticalware_Direct_Drive Ender_3_Pro_ESUN_Black_PLA.fff

Hardware that I used:
Ender 3 Pro

Direct Drive
https://amzn.to/2IR0usR

Hotend
https://amzn.to/37iIrVW

Tubing
https://amzn.to/2IQ8V7N

eSun PLA+
https://amzn.to/37gdSjs

And I have the following gear in place running Octoprint:
Raspberry Pi 4 (4gb)
https://amzn.to/3q551IO

SanDisk 32GB Ultra microSDHC UHS-I Memory Card with Adapter
https://amzn.to/2Vfvo0y

CanaKit 3.5A Raspberry Pi 4 Power Supply (USB-C)
https://amzn.to/3fNTYPu

CanaKit Raspberry Pi 4 Micro HDMI Cable – 6 Feet
https://amzn.to/33u5hr9

Western Digital 500GB WD_Black SN750 NVMe
https://amzn.to/3nZ5pH4

Plugable USB C to M.2 NVMe Tool-free Enclosure
https://amzn.to/3lflV3L

The most important thing is after you setup your system, you will need to dial it in. For that, you can refer to these pages:
Configure your Extrusion Multiplier:
https://tacticalware.com/ender-3-pro-simplify3d-configuring-the-extrusion-multiplier/

Confirm your heat settings:
https://tacticalware.com/3d-printing-heat-tower/


Thanks for reading!
SIMPLIFY3D SETTINGS FOR AN ENDER 3 PRO USING ESUN’S White PLA+

I am in the process of putting together several posts, which detail my printer hardware, along with giving you a copy of my FFF profile for that setup. For this post I am using Simplify3D to Slice eSun’s White PLA+, on a Creality Ender 3 Pro using a Micro Swiss Hotend. If you have already downloaded and are using my eSun Black PLA FFF file, you will still need this one. Different Colors require different settings.

Slicer Profile can be downloaded here:
https://tacticalware.com/downloads/Tacticalware_Ender_3_Pro_eSun_White_PLA.fff

Hardware that I used:
Ender 3 Pro


Hotend
https://amzn.to/37iIrVW

Tubing
https://amzn.to/2IQ8V7N

eSun White PLA+
https://amzn.to/3gLFU9T

And I have the following gear in place running Octoprint:
Raspberry Pi 4 (4gb)
https://amzn.to/3q551IO

SanDisk 32GB Ultra microSDHC UHS-I Memory Card with Adapter
https://amzn.to/2Vfvo0y

CanaKit 3.5A Raspberry Pi 4 Power Supply (USB-C)
https://amzn.to/3fNTYPu

CanaKit Raspberry Pi 4 Micro HDMI Cable – 6 Feet
https://amzn.to/33u5hr9

Western Digital 500GB WD_Black SN750 NVMe
https://amzn.to/3nZ5pH4

Plugable USB C to M.2 NVMe Tool-free Enclosure
https://amzn.to/3lflV3L

The most important thing is after you setup your system, you will need to dial it in. For that, you can refer to these pages:
Configure your Extrusion Multiplier:
https://tacticalware.com/ender-3-pro-simplify3d-configuring-the-extrusion-multiplier/

Confirm your heat settings:
https://tacticalware.com/3d-printing-heat-tower/

Thanks for reading!

SIMPLIFY3D SETTINGS FOR AN ENDER 3 PRO USING ESUN’S BLACK PLA

I am in the process of putting together several posts, which detail my printer hardware, along with giving you a copy of my FFF profile for that setup. For this post I am using Simplify3D to Slice eSun’s Black PLA, on a Creality Ender 3 Pro using a Micro Swiss Hotend.

Slicer Profile can be downloaded here:
https://tacticalware.com/downloads/Tacticalware_Ender_3_Pro_ESUN_Black_PLA.fff

Hardware that I used:
Ender 3 Pro


Hotend
https://amzn.to/37iIrVW

Tubing
https://amzn.to/2IQ8V7N

eSun PLA+
https://amzn.to/37gdSjs


And I have the following gear in place running Octoprint:
Raspberry Pi 4 (4gb)
https://amzn.to/3q551IO

SanDisk 32GB Ultra microSDHC UHS-I Memory Card with Adapter
https://amzn.to/2Vfvo0y

CanaKit 3.5A Raspberry Pi 4 Power Supply (USB-C)
https://amzn.to/3fNTYPu

CanaKit Raspberry Pi 4 Micro HDMI Cable – 6 Feet
https://amzn.to/33u5hr9

Western Digital 500GB WD_Black SN750 NVMe
https://amzn.to/3nZ5pH4

Plugable USB C to M.2 NVMe Tool-free Enclosure
https://amzn.to/3lflV3L

The most important thing is after you setup your system, you will need to dial it in. For that, you can refer to these pages:
Configure your Extrusion Multiplier:
https://tacticalware.com/ender-3-pro-simplify3d-configuring-the-extrusion-multiplier/

Confirm your heat settings:
https://tacticalware.com/3d-printing-heat-tower/

Thanks for reading!

ENDER 3 PRO – UNDER EXTRUSION ISSUE [SOLVED]

To fine tune your Ender 3 Pro you will need to measure the amount of filament that is passing through the machine using the following test, to ensure your settings are correct

First you going to want to disconnect your hotend from the extruder, and place these in an area where you can heat them up and they will not damage themselves or anything around them.

Next you’re going to want to go into the settings of your Ender 3 and click on preheat PLA. This will warm up the hot end and allow you to extrude for our test

Measure out 120mm from entry point on extruder to the spool, and mark it on the filament using a notch or a marker (I prefer a slight notch)

Open Octopi
Go to Terminal Tab
Enter in the following code
G1 E100 F100
Press Send
This will extrude 100mm of filament

Now measure the difference of what went in, verses what is left.
I extruded 90.5mm instead of 100mm, and have 29.5mm left before my notch

Back in Octopi
Terminal Tab
Enter in the following code
M503
Press Send

Search for M92 line and verify it says E93
This is what you will edit

To figure out the new value for E93 do the following
100/90.5*93=102.76
E93 should be E102.76

The values above translate to this
100 – Distance that should have been extruded
/ – divided by
90.5 – is the distance that was extruded
* – Multiplied by
93 – This is the E93 value we saw earlier

Back to Octopi Terminal Tab
Enter in the following
M92 E102.76
Press Send

Enter in the following
M500
Press Send

Your new settings are saved, and your extrusion will be accurate. Feel free to repeat the above steps to ensure your settings are correct and the extrusion works as expected

Ended 3 Pro – Massive Layer Shift in Mid Print [SOLVED]

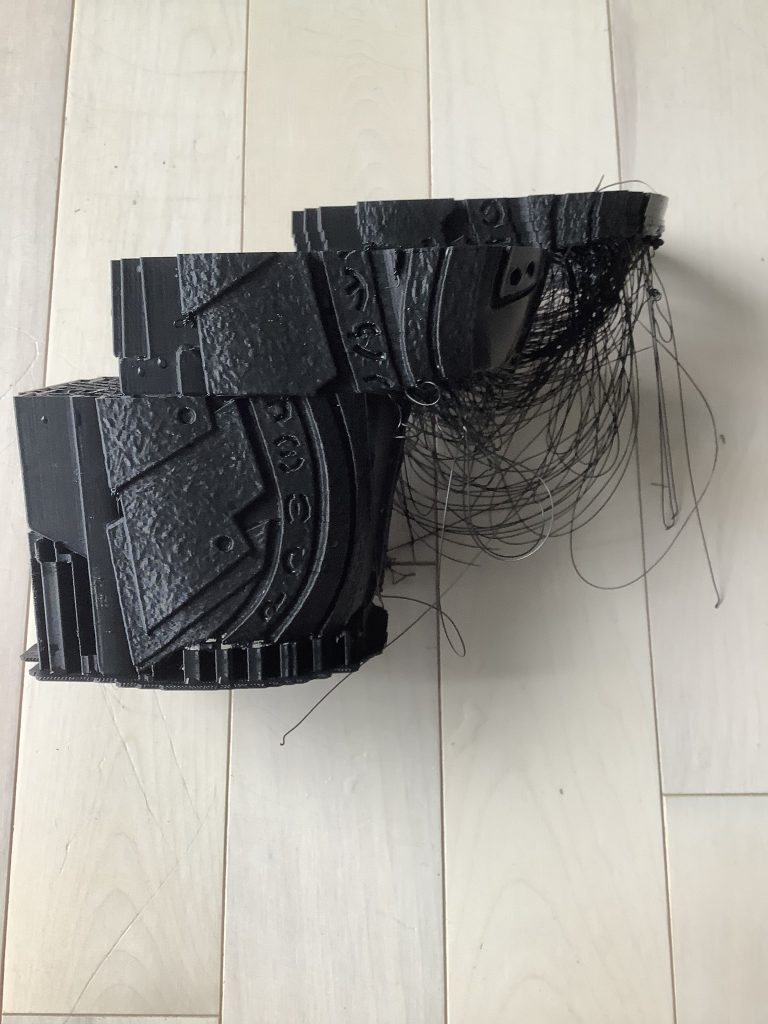
OK so I was in the middle of printing the gauntlet from the predator costume and about halfway through the print a massive layer shift occurred. Continuing on with the print thinking that I can just cut that Layer and reattach it properly another massive layer shift happened.

Layer shift generally happens very early on in the print out is because a base layer essentially had issues. With this being so far and you can tell that’s not the case at all …. so what was causing all this

After re-slicing and re-printing check in the environmental factors and 100 other things the final verdict on it was……

Heat!

This was printed in an enclosure in the ambient temperature was above 90°F. This temperature in the enclosure caused the later shift because one of the Axis motors temporarily overheated and shut down, all while the other two motors kept on printing. When the motor restarted it was in the wrong position causing the later shift.