Skip to content
Home » simplify3d

simplify3d

Visit Tacticalware.com for information related to this tag and others. We look forward to assisting in your tech projects with our in-depth knowledgebase…

SIMPLIFY3D DOES NOT START

This is a quick fix for those times when Simplify3D does not start. Even if you reinstall the application, it refuses to start.

Here is how you fix it

Open

C:/Users/%username%/AppData/Local/Simplify3D/S3D-Software

Delete the file named “savedState.factory”

Now Simplify3D will start

SIMPLIFY3D SETTINGS FOR A DIRECT DRIVE ENDER 3 PRO USING eSUN’S PETG IN BLACK

I am in the process of putting together several posts, which detail my printer hardware, along with giving you a copy of my FFF profile for that setup. For this post I am using Simplify3D to Slice eSUN’s PETG in Black, on a Creality Ender 3 Pro with a Direct Drive setup, using a Micro Swiss Hotend.

Slicer Profile can be downloaded here:
https://tacticalware.com/downloads/Tacticalware_Direct_Drive_Ender_3_Pro_ESUN_Black_PETG.fff

Hardware that I used:
Ender 3 Pro
https://amzn.to/3qZQTks

Direct Drive
https://amzn.to/2IR0usR

Hotend
https://amzn.to/37iIrVW

Tubing
https://amzn.to/2IQ8V7N

eSun PETG
https://amzn.to/34fRxke

And I have the following gear in place running Octoprint:
Raspberry Pi 4 (4gb)
https://amzn.to/3q551IO

SanDisk 32GB Ultra microSDHC UHS-I Memory Card with Adapter
https://amzn.to/2Vfvo0y

CanaKit 3.5A Raspberry Pi 4 Power Supply (USB-C)
https://amzn.to/3fNTYPu

CanaKit Raspberry Pi 4 Micro HDMI Cable – 6 Feet
https://amzn.to/33u5hr9

Western Digital 500GB WD_Black SN750 NVMe
https://amzn.to/3nZ5pH4

Plugable USB C to M.2 NVMe Tool-free Enclosure
https://amzn.to/3lflV3L

The most important thing is after you setup your system, you will need to dial it in. For that, you can refer to these pages:
Configure your Extrusion Multiplier:
https://tacticalware.com/ender-3-pro-simplify3d-configuring-the-extrusion-multiplier/

Confirm your heat settings:
https://tacticalware.com/3d-printing-heat-tower/

Thanks for reading!

SIMPLIFY3D SETTINGS FOR A DIRECT DRIVE ENDER 3 PRO USING HATCHBOX’S PETG IN BLACK

I am in the process of putting together several posts, which detail my printer hardware, along with giving you a copy of my FFF profile for that setup. For this post I am using Simplify3D to Slice Hatchbox’s PETG in Black, on a Creality Ender 3 Pro with a Direct Drive setup, using a Micro Swiss Hotend.

Slicer Profile can be downloaded here:
https://tacticalware.com/downloads/Tacticalware_Direct_Drive_Ender_3_Pro_HATCHBOX_Black_PETG.fff

Hardware that I used:
Ender 3 Pro
https://amzn.to/3qZQTks

Direct Drive
https://amzn.to/2IR0usR

Hotend
https://amzn.to/37iIrVW

Tubing
https://amzn.to/2IQ8V7N

Hatchbox PETG
https://amzn.to/385qWHQ

And I have the following gear in place running Octoprint:
Raspberry Pi 4 (4gb)
https://amzn.to/3q551IO

SanDisk 32GB Ultra microSDHC UHS-I Memory Card with Adapter
https://amzn.to/2Vfvo0y

CanaKit 3.5A Raspberry Pi 4 Power Supply (USB-C)
https://amzn.to/3fNTYPu

CanaKit Raspberry Pi 4 Micro HDMI Cable – 6 Feet
https://amzn.to/33u5hr9

Western Digital 500GB WD_Black SN750 NVMe
https://amzn.to/3nZ5pH4

Plugable USB C to M.2 NVMe Tool-free Enclosure
https://amzn.to/3lflV3L

The most important thing is after you setup your system, you will need to dial it in. For that, you can refer to these pages:
Configure your Extrusion Multiplier:
https://tacticalware.com/ender-3-pro-simplify3d-configuring-the-extrusion-multiplier/

Confirm your heat settings:
https://tacticalware.com/3d-printing-heat-tower/


Thanks for reading!

SIMPLIFY3D SETTINGS FOR A DIRECT DRIVE ENDER 3 PRO USING SainSmart’s TPU

I am in the process of putting together several posts, which detail my printer hardware, along with giving you a copy of my FFF profile for that setup. For this post I am using Simplify3D to Slice SainSmart’s TPU, on a Creality Ender 3 Pro with a Direct Drive setup, using a Micro Swiss Hotend.

Slicer Profile can be downloaded here:
https://tacticalware.com/downloads/Tacticalware_Direct_Drive_Ender_3_Pro_SainSmart_TPU_Red.fff

Hardware that I used:
Ender 3 Pro
https://amzn.to/3qZQTks

Direct Drive
https://amzn.to/2IR0usR

Hotend
https://amzn.to/37iIrVW

Tubing
https://amzn.to/2IQ8V7N

SainSmart Red TPU
https://amzn.to/3mmCOdB

And I have the following gear in place running Octoprint:
Raspberry Pi 4 (4gb)
https://amzn.to/3q551IO

SanDisk 32GB Ultra microSDHC UHS-I Memory Card with Adapter
https://amzn.to/2Vfvo0y

CanaKit 3.5A Raspberry Pi 4 Power Supply (USB-C)
https://amzn.to/3fNTYPu

CanaKit Raspberry Pi 4 Micro HDMI Cable – 6 Feet
https://amzn.to/33u5hr9

Western Digital 500GB WD_Black SN750 NVMe
https://amzn.to/3nZ5pH4

Plugable USB C to M.2 NVMe Tool-free Enclosure
https://amzn.to/3lflV3L

The most important thing is after you setup your system, you will need to dial it in. For that, you can refer to these pages:
Configure your Extrusion Multiplier:
https://tacticalware.com/ender-3-pro-simplify3d-configuring-the-extrusion-multiplier/

Confirm your heat settings:
https://tacticalware.com/3d-printing-heat-tower/

Thanks for reading!

SIMPLIFY3D SETTINGS FOR A DIRECT DRIVE ENDER 3 PRO USING eSUN PLA+ BLACK

I am in the process of putting together several posts, which detail my printer hardware, along with giving you a copy of my FFF profile for that setup. For this post I am using Simplify3D to Slice eSUN’s PLA+ in Black, on a Creality Ender 3 Pro with a Direct Drive setup, using a Micro Swiss Hotend.

Slicer Profile can be downloaded here:
https://tacticalware.com/downloads/Tacticalware_Direct_Drive Ender_3_Pro_ESUN_Black_PLA.fff

Hardware that I used:
Ender 3 Pro
https://amzn.to/3qZQTks

Direct Drive
https://amzn.to/2IR0usR

Hotend
https://amzn.to/37iIrVW

Tubing
https://amzn.to/2IQ8V7N

eSun PLA+
https://amzn.to/37gdSjs

And I have the following gear in place running Octoprint:
Raspberry Pi 4 (4gb)
https://amzn.to/3q551IO

SanDisk 32GB Ultra microSDHC UHS-I Memory Card with Adapter
https://amzn.to/2Vfvo0y

CanaKit 3.5A Raspberry Pi 4 Power Supply (USB-C)
https://amzn.to/3fNTYPu

CanaKit Raspberry Pi 4 Micro HDMI Cable – 6 Feet
https://amzn.to/33u5hr9

Western Digital 500GB WD_Black SN750 NVMe
https://amzn.to/3nZ5pH4

Plugable USB C to M.2 NVMe Tool-free Enclosure
https://amzn.to/3lflV3L

The most important thing is after you setup your system, you will need to dial it in. For that, you can refer to these pages:
Configure your Extrusion Multiplier:
https://tacticalware.com/ender-3-pro-simplify3d-configuring-the-extrusion-multiplier/

Confirm your heat settings:
https://tacticalware.com/3d-printing-heat-tower/


Thanks for reading!

SIMPLIFY3D SETTINGS FOR AN ENDER 3 PRO USING ESUN’S White PLA+

I am in the process of putting together several posts, which detail my printer hardware, along with giving you a copy of my FFF profile for that setup. For this post I am using Simplify3D to Slice eSun’s White PLA+, on a Creality Ender 3 Pro using a Micro Swiss Hotend. If you have already downloaded and are using my eSun Black PLA FFF file, you will still need this one. Different Colors require different settings.

Slicer Profile can be downloaded here:
https://tacticalware.com/downloads/Tacticalware_Ender_3_Pro_eSun_White_PLA.fff

Hardware that I used:
Ender 3 Pro
https://amzn.to/3qZQTks

Hotend
https://amzn.to/37iIrVW

Tubing
https://amzn.to/2IQ8V7N

eSun White PLA+
https://amzn.to/3gLFU9T

And I have the following gear in place running Octoprint:
Raspberry Pi 4 (4gb)
https://amzn.to/3q551IO

SanDisk 32GB Ultra microSDHC UHS-I Memory Card with Adapter
https://amzn.to/2Vfvo0y

CanaKit 3.5A Raspberry Pi 4 Power Supply (USB-C)
https://amzn.to/3fNTYPu

CanaKit Raspberry Pi 4 Micro HDMI Cable – 6 Feet
https://amzn.to/33u5hr9

Western Digital 500GB WD_Black SN750 NVMe
https://amzn.to/3nZ5pH4

Plugable USB C to M.2 NVMe Tool-free Enclosure
https://amzn.to/3lflV3L

The most important thing is after you setup your system, you will need to dial it in. For that, you can refer to these pages:
Configure your Extrusion Multiplier:
https://tacticalware.com/ender-3-pro-simplify3d-configuring-the-extrusion-multiplier/

Confirm your heat settings:
https://tacticalware.com/3d-printing-heat-tower/

Thanks for reading!

SIMPLIFY3D SETTINGS FOR AN ENDER 3 PRO USING ESUN’S BLACK PLA

I am in the process of putting together several posts, which detail my printer hardware, along with giving you a copy of my FFF profile for that setup. For this post I am using Simplify3D to Slice eSun’s Black PLA, on a Creality Ender 3 Pro using a Micro Swiss Hotend.

Slicer Profile can be downloaded here:
https://tacticalware.com/downloads/Tacticalware_Ender_3_Pro_ESUN_Black_PLA.fff

Hardware that I used:
Ender 3 Pro
https://amzn.to/3qZQTks

Hotend
https://amzn.to/37iIrVW

Tubing
https://amzn.to/2IQ8V7N

eSun PLA+
https://amzn.to/37gdSjs


And I have the following gear in place running Octoprint:
Raspberry Pi 4 (4gb)
https://amzn.to/3q551IO

SanDisk 32GB Ultra microSDHC UHS-I Memory Card with Adapter
https://amzn.to/2Vfvo0y

CanaKit 3.5A Raspberry Pi 4 Power Supply (USB-C)
https://amzn.to/3fNTYPu

CanaKit Raspberry Pi 4 Micro HDMI Cable – 6 Feet
https://amzn.to/33u5hr9

Western Digital 500GB WD_Black SN750 NVMe
https://amzn.to/3nZ5pH4

Plugable USB C to M.2 NVMe Tool-free Enclosure
https://amzn.to/3lflV3L

The most important thing is after you setup your system, you will need to dial it in. For that, you can refer to these pages:
Configure your Extrusion Multiplier:
https://tacticalware.com/ender-3-pro-simplify3d-configuring-the-extrusion-multiplier/

Confirm your heat settings:
https://tacticalware.com/3d-printing-heat-tower/

Thanks for reading!

SIMPLIFY3D SETTINGS FOR A CR-10 S5 USING GRAFT MILK’s MATTE BLACK PLA

I am in the process of putting together several posts, which detail my printer hardware, along with giving you a copy of my FFF profile for that setup. For this post I am using Simplify3D to Slice Graft Milk’s Matte Black PLA, on a Creality CR10S5 using a Bondtech BMG extruder, and a Micro Swiss Hotend.

Slicer Profile can be downloaded here:
https://tacticalware.com/downloads/Tacticalware_CR-10_S5_Graft_Milk_Black_PLA.fff

Hardware that I used:
CR-10 S5
https://amzn.to/3qZQTks

Extruder
https://amzn.to/3oQD8CN

Hotend
https://amzn.to/37iIrVW

Tubing
https://amzn.to/2IQ8V7N

Graft Milk PLA


And I have the following gear in place running Octoprint:
Raspberry Pi 4 (4gb)
https://amzn.to/3q551IO

SanDisk 32GB Ultra microSDHC UHS-I Memory Card with Adapter
https://amzn.to/2Vfvo0y

CanaKit 3.5A Raspberry Pi 4 Power Supply (USB-C)
https://amzn.to/3fNTYPu

CanaKit Raspberry Pi 4 Micro HDMI Cable – 6 Feet
https://amzn.to/33u5hr9

Western Digital 500GB WD_Black SN750 NVMe
https://amzn.to/3nZ5pH4

Plugable USB C to M.2 NVMe Tool-free Enclosure
https://amzn.to/3lflV3L

The most important thing is after you setup your system, you will need to dial it in. For that, you can refer to these pages:
Configure your Extrusion Multiplier:
https://tacticalware.com/ender-3-pro-simplify3d-configuring-the-extrusion-multiplier/

Confirm your heat settings:
https://tacticalware.com/3d-printing-heat-tower/

Thanks for reading!

PETG – JAMMING HOTEND, BRITTLE LAYERS AND BREAKS EASILY [SOLVED]


Let’s start here…some PETG prints were amazing…clips, guides, knobs, just about anything without a long flat layer that had infill.

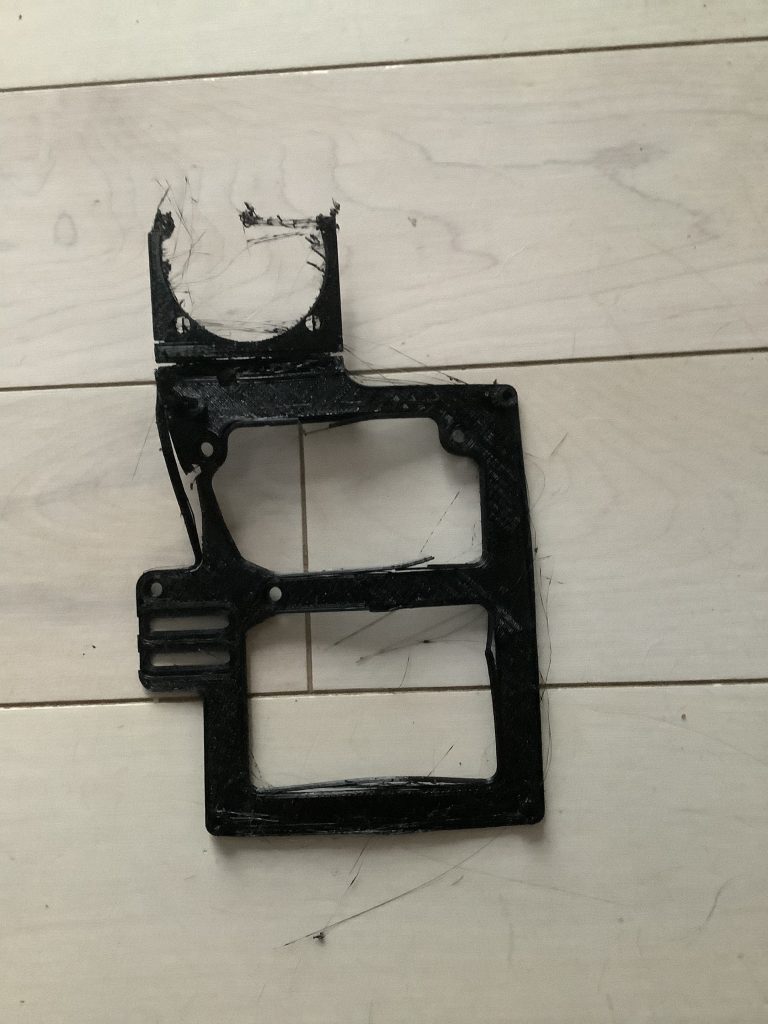
Then began my struggle (see the image below)


After meticulously dialing in my system, running retraction tests, heat towers, extrusion stepper modifications, extrusion multipliers, drying out filament and many many other steps to prep my system for a successful run with PETG prints…. My hotend kept jamming or under extruding, the extruder would click and click, and my prints were terrible.

After it would finish printing, it would break apart by simply touching it….

The solution to this…..

Open Simplify3D

Modify the FFF process

Go to the cooling tab

Set cooling on Layer 1 to 0

Remove all other setpoints

Uncheck the box that says Increase fan speed for layers below

Save, reslice and reprint
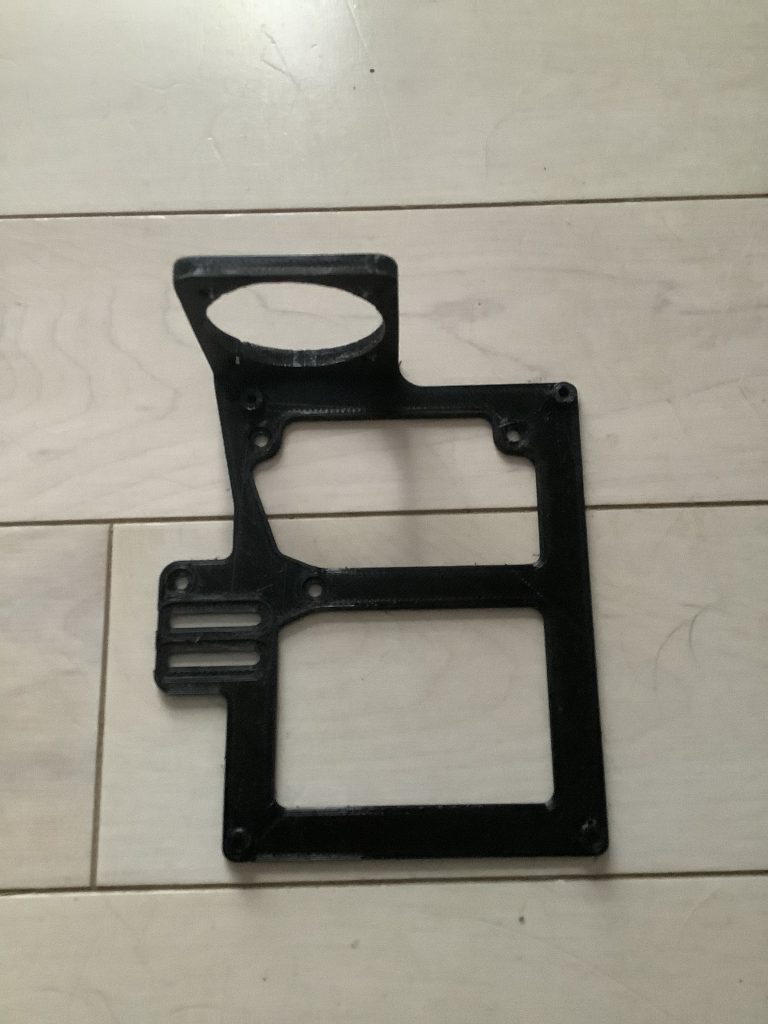
The result…

A solid print in PETG

PETG loves heat….and is ruined with cooling

Now It’s time for me to go back around and reconfigure my system with the extrusion multiplier, speed tests, heat towers, retraction tests….everything

ENDER 3 PRO – SIMPLIFY3D – CONFIGURING THE EXTRUSION MULTIPLIER

To figure this out, you can download Teaching Tech’s files on Thingiverse
https://www.thingiverse.com/thing:3071464

Unpack the files

Open up Simplify3d

Import the file called cube

Go to your processes and change the following settings:
On the Extruder tab
Set extrusion width to 0.48
Set extrusion multiplier to 1.00
Drag the Infill slider to Zero
On the Layer tab
Set Top Solid Layers to 0
Set Bottom Solid Layers to 0
Set Outline/Perimeter Shells to 1

Click Prepare to Print for the cube

You should see that the cube is 1 layer wide

Measure the wall thickness of this cube after it prints. My wall thickness measured in at 0.58

Now, to find out if the extrusion multiplier is accurate, run the following formula:
Desired Wall Thickness / Measured Wall Thickness * Extrusion multiplier = New Extrusion Multiplier
(Ex. 0.48 / 0.58 * 1.00 = 0.8275)


I will round the 0.8275 up to 0.83 and set this as my Extrusion Multiplier setting

Now to reprint the cube to ensure accuracy