Skip to content
Home » Tools » Page 2

Tools

Tech Tools, Related Information, How-To’s, Tips, Tools, and Guides

[FIXED] PARROT OS NTP TIME INACTIVE

When you run timedatectl it will show you the current date and time on your Parrot box. You will also see that NTP in inactive. To fix it

sudo timedatectl set-ntp true

Then run

timedatectl

and the correct time will now show

INSTALL ESXI 8 ON INTEL NUC 12

Here is how I was able to install ESXi 8 onto my Intel NUC 12 Wall Street Canyon

Press Power Button

Press F2 to get into the BIOS

Navigate to the Power, Performance and Cooling tab

Select External Ambient Temperature

Set to User Defined

Mouse over to Performance and click on it

Set the number of E-Cores to 0

F10 to save and Exit BIOS

Now you can reboot and install ESXi

[FIXED] VIRTUALMIN HTTP TO HTTPS REDIRECT

By default virtualmin creates sites in both http and https. Here is how to force all your traffic to your HTTPS site only

Log into Virtualmin

Select the Domain

Choose Server Configuration

Select Website Options

Place a dot next to Redirect HTTP to HTTPS by default

Save

And you are done. Your traffic now redirects

{FIXED} VIRTUALMIN PROFTPD ERROR AFTER UPGRADE TO UBUNTU 22.04

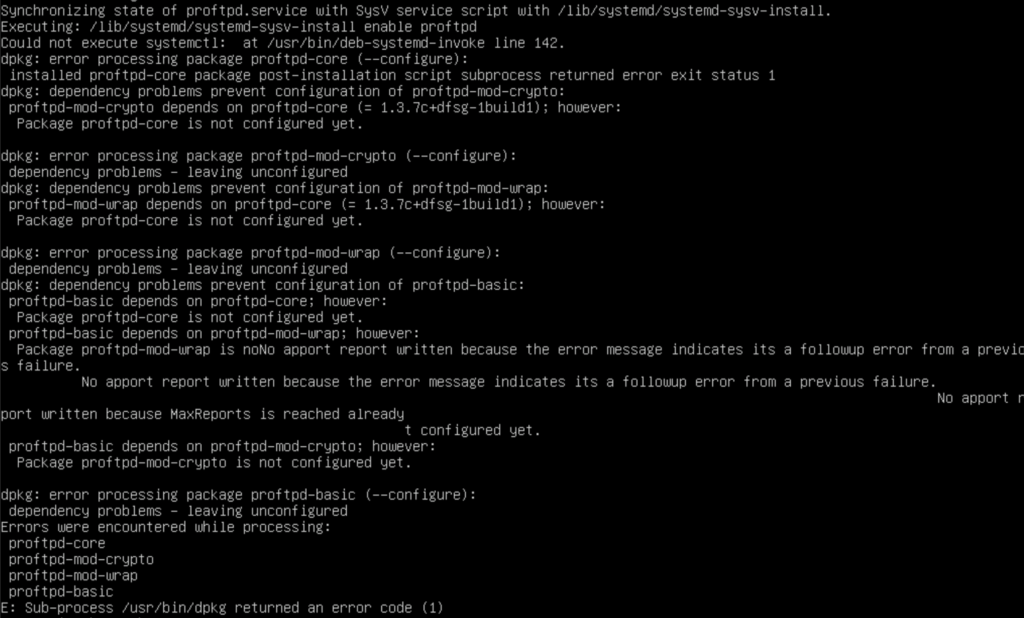
If you are receiving the following error after the upgrade:

UBUNTU 22.04 Upgrade Error with proftpd

Then you must do the following
sudo apt remove proftpd*
sudo apt purge proftpd*

Now you can run updates normally
sudo apt-get update
sudo apt-get upgrade

and you will not see the error anymore

And with that, you are welcome


UPGRADE UBUNTU 20.04 TO 22.04

Quick how-to run and upgrade from the command line

Do not SSH into the server. Use KVM or a local connection to the server

Login

sudo bash

apt-get update

apt-get upgrade

apt-get dist-upgrade

do-release-upgrade

The server will upgrade to the latest version

INSTALL COMPOSER 2 ON UBUNTU 20.04

Quick How-To for getting composer 2 to work since composer 1 has been deprecated

Login to a terminal

sudo bash
apt-get update
apt-get upgrade
apt install php-cli unzip
exit
cd ~
curl -sS https://getcomposer.org/installer -o /tmp/composer-setup.php

HASH=`curl -sS https://composer.github.io/installer.sig`

echo hash

php -r “if (hash_file(‘SHA384’, ‘/tmp/composer-setup.php’) === ‘$HASH’) { echo ‘Installer verified’; } else { echo ‘Installer corrupt’; unlink(‘composer-setup.php’); } echo PHP_EOL;”

Installer will be verified

sudo php /tmp/composer-setup.php –install-dir=/usr/local/bin –filename=composer

Composer will download and install

Then Type:
composer

You should see a Composer info screen

UPGRADE MAUTIC ON UBUNTU 20.04

Quick how-to on the way I upgraded mautic, since upgrading through the web breaks my installations every time.

Login into your Virtualmin

Backup all of your virtual servers

Download the backups to your pc

Open Putty

SSH to Server

sudo su –

cd to your mautic directory (/home/user/html)

php bin/console mautic:update:find

php bin/console mautic:update:apply

php bin/console mautic:update:apply –finish

Open your mautic installation, refresh the web page, check the bottom right, and you will see the latest version. In my case it is 4.4.8

EMAIL WARMING USING POWER AUTOMATE – SENDING FROM DOMAIN

For those of you who need to get a positive reputation on your domain for email campaigns, you first need to warm up the domain. Here is a simple power automate flow to assist with the task.

Login into Office.com

Click on the Menu to the Top Left of the screen

Select Power Automate

Click My Flows

Click +New Flow

Select Scheduled Cloud Flow

Give it a Name, Start Date, and Interval on how often you want it to run

Click Next

Click + Next Step

Type in mail and press Enter

Select Send EMAIL V3

Put in the FROM address of a user for the new domain you want to send email to
ex: user@tacticalware.com

Enter in a To Address for another email you own, that is off domain from the domain you are warming up.
ex: tacticalwarexyz123@gmail.com

Enter in a Subject

Add some Text to the Body

Click Save

Test your Flow, and email should go though now.

Next you will want to setup an auto reply on the receiving email address, and also setup a power automate flow from the email domain so you can generate content coming out of it.

EMAIL WARMING USING POWER AUTOMATE – SENDING TO DOMAIN

For those of you who need to get a positive reputation on your domain for email campaigns, you first need to warm up the domain. Here is a simple power automate flow to assist with the task.

Login into Office.com

Click on the Menu to the Top Left of the screen

Select Power Automate

Click My Flows

Click +New Flow

Select Scheduled Cloud Flow

Give it a Name, Start Date, and Interval on how often you want it to run

Click Next

Click + Next Step

Type in mail and press Enter

Select Send an Email V2

Put in the address of a user for the new domain you want to send email to
ex: user@tacticalware.com

Enter in a Subject

Add some Text to the Body

Click Save

Test your Flow, and email should go though now.

Next you will want to setup an auto reply on the receiving email address, and also setup a power automate flow from the email domain so you can generate content coming out of it.
HOW TO CHECK A DKIM RECORD

This one is quick and easy. You need to know the record info that was setup with the DNS Provider to do it

Go to https://MXToolBox.com/NetworkTools.aspx

Find the DKIM Box

Enter in the domain:selector info
Example – tacticalware.com:mydkim

Press the DKIM Lookup button

If it is setup properly you will see in green, the dkim information. If it is setup improperly, you will see an error, as you would see if you searched for the dkim tacticalware.com:mydkim