Skip to content
Home » 3D Printing

3D Printing

3D Printing Information, How-To’s, Tips, Tools, and Guides

SIMPLIFY3D DOES NOT START

This is a quick fix for those times when Simplify3D does not start. Even if you reinstall the application, it refuses to start.

Here is how you fix it

Open

C:/Users/%username%/AppData/Local/Simplify3D/S3D-Software

Delete the file named “savedState.factory”

Now Simplify3D will start

SIMPLIFY3D SETTINGS FOR A DIRECT DRIVE ENDER 3 PRO USING eSUN’S PETG IN BLACK

I am in the process of putting together several posts, which detail my printer hardware, along with giving you a copy of my FFF profile for that setup. For this post I am using Simplify3D to Slice eSUN’s PETG in Black, on a Creality Ender 3 Pro with a Direct Drive setup, using a Micro Swiss Hotend.

Slicer Profile can be downloaded here:
https://tacticalware.com/downloads/Tacticalware_Direct_Drive_Ender_3_Pro_ESUN_Black_PETG.fff

Hardware that I used:
Ender 3 Pro

Direct Drive
https://amzn.to/2IR0usR

Hotend
https://amzn.to/37iIrVW

Tubing
https://amzn.to/2IQ8V7N

eSun PETG
https://amzn.to/34fRxke

And I have the following gear in place running Octoprint:
Raspberry Pi 4 (4gb)
https://amzn.to/3q551IO

SanDisk 32GB Ultra microSDHC UHS-I Memory Card with Adapter
https://amzn.to/2Vfvo0y

CanaKit 3.5A Raspberry Pi 4 Power Supply (USB-C)
https://amzn.to/3fNTYPu

CanaKit Raspberry Pi 4 Micro HDMI Cable – 6 Feet
https://amzn.to/33u5hr9

Western Digital 500GB WD_Black SN750 NVMe
https://amzn.to/3nZ5pH4

Plugable USB C to M.2 NVMe Tool-free Enclosure
https://amzn.to/3lflV3L

The most important thing is after you setup your system, you will need to dial it in. For that, you can refer to these pages:
Configure your Extrusion Multiplier:
https://tacticalware.com/ender-3-pro-simplify3d-configuring-the-extrusion-multiplier/

Confirm your heat settings:
https://tacticalware.com/3d-printing-heat-tower/

Thanks for reading!

SIMPLIFY3D SETTINGS FOR A DIRECT DRIVE ENDER 3 PRO USING HATCHBOX’S PETG IN BLACK

I am in the process of putting together several posts, which detail my printer hardware, along with giving you a copy of my FFF profile for that setup. For this post I am using Simplify3D to Slice Hatchbox’s PETG in Black, on a Creality Ender 3 Pro with a Direct Drive setup, using a Micro Swiss Hotend.

Slicer Profile can be downloaded here:
https://tacticalware.com/downloads/Tacticalware_Direct_Drive_Ender_3_Pro_HATCHBOX_Black_PETG.fff

Hardware that I used:
Ender 3 Pro

Direct Drive
https://amzn.to/2IR0usR

Hotend
https://amzn.to/37iIrVW

Tubing
https://amzn.to/2IQ8V7N

Hatchbox PETG
https://amzn.to/385qWHQ

And I have the following gear in place running Octoprint:
Raspberry Pi 4 (4gb)
https://amzn.to/3q551IO

SanDisk 32GB Ultra microSDHC UHS-I Memory Card with Adapter
https://amzn.to/2Vfvo0y

CanaKit 3.5A Raspberry Pi 4 Power Supply (USB-C)
https://amzn.to/3fNTYPu

CanaKit Raspberry Pi 4 Micro HDMI Cable – 6 Feet
https://amzn.to/33u5hr9

Western Digital 500GB WD_Black SN750 NVMe
https://amzn.to/3nZ5pH4

Plugable USB C to M.2 NVMe Tool-free Enclosure
https://amzn.to/3lflV3L

The most important thing is after you setup your system, you will need to dial it in. For that, you can refer to these pages:
Configure your Extrusion Multiplier:
https://tacticalware.com/ender-3-pro-simplify3d-configuring-the-extrusion-multiplier/

Confirm your heat settings:
https://tacticalware.com/3d-printing-heat-tower/


Thanks for reading!

SIMPLIFY3D SETTINGS FOR A DIRECT DRIVE ENDER 3 PRO USING SainSmart’s TPU

I am in the process of putting together several posts, which detail my printer hardware, along with giving you a copy of my FFF profile for that setup. For this post I am using Simplify3D to Slice SainSmart’s TPU, on a Creality Ender 3 Pro with a Direct Drive setup, using a Micro Swiss Hotend.

Slicer Profile can be downloaded here:
https://tacticalware.com/downloads/Tacticalware_Direct_Drive_Ender_3_Pro_SainSmart_TPU_Red.fff

Hardware that I used:
Ender 3 Pro

Direct Drive
https://amzn.to/2IR0usR

Hotend
https://amzn.to/37iIrVW

Tubing
https://amzn.to/2IQ8V7N

SainSmart Red TPU
https://amzn.to/3mmCOdB

And I have the following gear in place running Octoprint:
Raspberry Pi 4 (4gb)
https://amzn.to/3q551IO

SanDisk 32GB Ultra microSDHC UHS-I Memory Card with Adapter
https://amzn.to/2Vfvo0y

CanaKit 3.5A Raspberry Pi 4 Power Supply (USB-C)
https://amzn.to/3fNTYPu

CanaKit Raspberry Pi 4 Micro HDMI Cable – 6 Feet
https://amzn.to/33u5hr9

Western Digital 500GB WD_Black SN750 NVMe
https://amzn.to/3nZ5pH4

Plugable USB C to M.2 NVMe Tool-free Enclosure
https://amzn.to/3lflV3L

The most important thing is after you setup your system, you will need to dial it in. For that, you can refer to these pages:
Configure your Extrusion Multiplier:
https://tacticalware.com/ender-3-pro-simplify3d-configuring-the-extrusion-multiplier/

Confirm your heat settings:
https://tacticalware.com/3d-printing-heat-tower/

Thanks for reading!

SIMPLIFY3D SETTINGS FOR A DIRECT DRIVE ENDER 3 PRO USING eSUN PLA+ BLACK

I am in the process of putting together several posts, which detail my printer hardware, along with giving you a copy of my FFF profile for that setup. For this post I am using Simplify3D to Slice eSUN’s PLA+ in Black, on a Creality Ender 3 Pro with a Direct Drive setup, using a Micro Swiss Hotend.

Slicer Profile can be downloaded here:
https://tacticalware.com/downloads/Tacticalware_Direct_Drive Ender_3_Pro_ESUN_Black_PLA.fff

Hardware that I used:
Ender 3 Pro

Direct Drive
https://amzn.to/2IR0usR

Hotend
https://amzn.to/37iIrVW

Tubing
https://amzn.to/2IQ8V7N

eSun PLA+
https://amzn.to/37gdSjs

And I have the following gear in place running Octoprint:
Raspberry Pi 4 (4gb)
https://amzn.to/3q551IO

SanDisk 32GB Ultra microSDHC UHS-I Memory Card with Adapter
https://amzn.to/2Vfvo0y

CanaKit 3.5A Raspberry Pi 4 Power Supply (USB-C)
https://amzn.to/3fNTYPu

CanaKit Raspberry Pi 4 Micro HDMI Cable – 6 Feet
https://amzn.to/33u5hr9

Western Digital 500GB WD_Black SN750 NVMe
https://amzn.to/3nZ5pH4

Plugable USB C to M.2 NVMe Tool-free Enclosure
https://amzn.to/3lflV3L

The most important thing is after you setup your system, you will need to dial it in. For that, you can refer to these pages:
Configure your Extrusion Multiplier:
https://tacticalware.com/ender-3-pro-simplify3d-configuring-the-extrusion-multiplier/

Confirm your heat settings:
https://tacticalware.com/3d-printing-heat-tower/


Thanks for reading!

SIMPLIFY3D SETTINGS FOR AN ENDER 3 PRO USING ESUN’S White PLA+

I am in the process of putting together several posts, which detail my printer hardware, along with giving you a copy of my FFF profile for that setup. For this post I am using Simplify3D to Slice eSun’s White PLA+, on a Creality Ender 3 Pro using a Micro Swiss Hotend. If you have already downloaded and are using my eSun Black PLA FFF file, you will still need this one. Different Colors require different settings.

Slicer Profile can be downloaded here:
https://tacticalware.com/downloads/Tacticalware_Ender_3_Pro_eSun_White_PLA.fff

Hardware that I used:
Ender 3 Pro


Hotend
https://amzn.to/37iIrVW

Tubing
https://amzn.to/2IQ8V7N

eSun White PLA+
https://amzn.to/3gLFU9T

And I have the following gear in place running Octoprint:
Raspberry Pi 4 (4gb)
https://amzn.to/3q551IO

SanDisk 32GB Ultra microSDHC UHS-I Memory Card with Adapter
https://amzn.to/2Vfvo0y

CanaKit 3.5A Raspberry Pi 4 Power Supply (USB-C)
https://amzn.to/3fNTYPu

CanaKit Raspberry Pi 4 Micro HDMI Cable – 6 Feet
https://amzn.to/33u5hr9

Western Digital 500GB WD_Black SN750 NVMe
https://amzn.to/3nZ5pH4

Plugable USB C to M.2 NVMe Tool-free Enclosure
https://amzn.to/3lflV3L

The most important thing is after you setup your system, you will need to dial it in. For that, you can refer to these pages:
Configure your Extrusion Multiplier:
https://tacticalware.com/ender-3-pro-simplify3d-configuring-the-extrusion-multiplier/

Confirm your heat settings:
https://tacticalware.com/3d-printing-heat-tower/

Thanks for reading!

SIMPLIFY3D SETTINGS FOR AN ENDER 3 PRO USING ESUN’S BLACK PLA

I am in the process of putting together several posts, which detail my printer hardware, along with giving you a copy of my FFF profile for that setup. For this post I am using Simplify3D to Slice eSun’s Black PLA, on a Creality Ender 3 Pro using a Micro Swiss Hotend.

Slicer Profile can be downloaded here:
https://tacticalware.com/downloads/Tacticalware_Ender_3_Pro_ESUN_Black_PLA.fff

Hardware that I used:
Ender 3 Pro


Hotend
https://amzn.to/37iIrVW

Tubing
https://amzn.to/2IQ8V7N

eSun PLA+
https://amzn.to/37gdSjs


And I have the following gear in place running Octoprint:
Raspberry Pi 4 (4gb)
https://amzn.to/3q551IO

SanDisk 32GB Ultra microSDHC UHS-I Memory Card with Adapter
https://amzn.to/2Vfvo0y

CanaKit 3.5A Raspberry Pi 4 Power Supply (USB-C)
https://amzn.to/3fNTYPu

CanaKit Raspberry Pi 4 Micro HDMI Cable – 6 Feet
https://amzn.to/33u5hr9

Western Digital 500GB WD_Black SN750 NVMe
https://amzn.to/3nZ5pH4

Plugable USB C to M.2 NVMe Tool-free Enclosure
https://amzn.to/3lflV3L

The most important thing is after you setup your system, you will need to dial it in. For that, you can refer to these pages:
Configure your Extrusion Multiplier:
https://tacticalware.com/ender-3-pro-simplify3d-configuring-the-extrusion-multiplier/

Confirm your heat settings:
https://tacticalware.com/3d-printing-heat-tower/

Thanks for reading!

SIMPLIFY3D SETTINGS FOR A CR-10 S5 USING GRAFT MILK’s MATTE BLACK PLA

I am in the process of putting together several posts, which detail my printer hardware, along with giving you a copy of my FFF profile for that setup. For this post I am using Simplify3D to Slice Graft Milk’s Matte Black PLA, on a Creality CR10S5 using a Bondtech BMG extruder, and a Micro Swiss Hotend.

Slicer Profile can be downloaded here:
https://tacticalware.com/downloads/Tacticalware_CR-10_S5_Graft_Milk_Black_PLA.fff

Hardware that I used:
CR-10 S5


Extruder
https://amzn.to/3oQD8CN

Hotend
https://amzn.to/37iIrVW

Tubing
https://amzn.to/2IQ8V7N

Graft Milk PLA


And I have the following gear in place running Octoprint:
Raspberry Pi 4 (4gb)
https://amzn.to/3q551IO

SanDisk 32GB Ultra microSDHC UHS-I Memory Card with Adapter
https://amzn.to/2Vfvo0y

CanaKit 3.5A Raspberry Pi 4 Power Supply (USB-C)
https://amzn.to/3fNTYPu

CanaKit Raspberry Pi 4 Micro HDMI Cable – 6 Feet
https://amzn.to/33u5hr9

Western Digital 500GB WD_Black SN750 NVMe
https://amzn.to/3nZ5pH4

Plugable USB C to M.2 NVMe Tool-free Enclosure
https://amzn.to/3lflV3L

The most important thing is after you setup your system, you will need to dial it in. For that, you can refer to these pages:
Configure your Extrusion Multiplier:
https://tacticalware.com/ender-3-pro-simplify3d-configuring-the-extrusion-multiplier/

Confirm your heat settings:
https://tacticalware.com/3d-printing-heat-tower/

Thanks for reading!

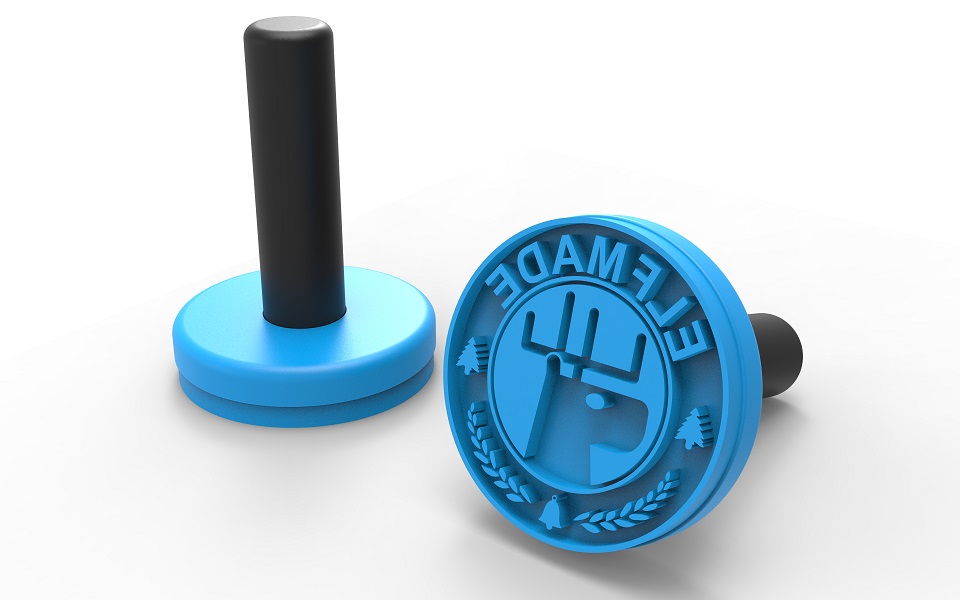
ELF MADE STAMP STL FROM SANTA CLAUS THE MOVIE

So I was watching Santa Claus the Movie…you know, that old movie from the 80s:
https://www.imdb.com/title/tt0089961/

In the movie, the Elves have this stamp that they stamp onto each of the toys they make…and in having little ones, I needed to get my hands on it.

Coincidently enough, I couldn’t find it online, as an STL….so I had one made, and want to give it to you as a Gift.

Elf Made Stamp STL


You can download it here:
https://tacticalware.com/downloads/Elf_Made.zip

Or directly from Thingiverse at:
https://www.thingiverse.com/thing:4685864

Hardware that I used to print it:
Ender 3 Pro

Hotend
https://amzn.to/37iIrVW

Tubing
https://amzn.to/2IQ8V7N

eSun Black PLA+ (For the Handle)
https://amzn.to/37gdSjs

TPU (For the Stamp)
https://amzn.to/3mmCOdB

And I have the following gear in place running Octoprint:
Raspberry Pi 4 (4gb)
https://amzn.to/3q551IO

SanDisk 32GB Ultra microSDHC UHS-I Memory Card with Adapter
https://amzn.to/2Vfvo0y

CanaKit 3.5A Raspberry Pi 4 Power Supply (USB-C)
https://amzn.to/3fNTYPu

CanaKit Raspberry Pi 4 Micro HDMI Cable – 6 Feet
https://amzn.to/33u5hr9

Western Digital 500GB WD_Black SN750 NVMe
https://amzn.to/3nZ5pH4

Plugable USB C to M.2 NVMe Tool-free Enclosure
https://amzn.to/3lflV3L

The most important thing is after you setup your system, before you print this stamp, is to calibrate your system for these filaments. You will need to do it for both the PLA+ and the TPU. For that, you can refer to these pages:
Configure your Extrusion Multiplier:
https://tacticalware.com/ender-3-pro-simplify3d-configuring-the-extrusion-multiplier/

Confirm your heat settings:
https://tacticalware.com/3d-printing-heat-tower/

Thanks for reading!


BOOT RASPBERRY PI 4 FROM M.2 USB DRIVE

If you want huge performance increases, consider getting rid of the Micro SD card, and moving your data and OS over to an M.2 Drive on the Raspberry Pi. How do you do this, you ask. First, make sure you have the same hardware as me, in order to follow along. Second, run through the following guide.

If you need to do this from scratch, follow this guide to setup your Raspberry Pi: https://tacticalware.com/install-raspbian-os-on-raspberry-pi-4/

Then, make sure your firmware / eeprom is up to date. If you need assistance with it, follow this guide:
https://tacticalware.com/update-new-raspberry-pi-4-firmware-eeprom/

Once you have both steps above completed, you can move onto setting up the M.2 drive

For this, I have inserted a WD 500GB M.2 Drive into a USB 3.0 dongle, and have it connected to my Pi. If you want to get the same parts as I have, skip to the bottom of this page.

Now, you will want to connect your M.2 dongle to your Raspberry Pi 4, and boot it up.

Once you are at the Desktop:
Open a Terminal
sudo bash
raspi-config
Select option 6 – Advanced Options
Choose option A6 – Boot Order
Select option B1 – USB Boot
Press Enter
You should now be on the “Usb device is the default boot device” screen
Select OK
Scroll to Finish and select it
You will see the message:
Would you like to reboot now?
Choose NO

Back on your Raspberry Pi 4 Desktop
In the top left corner, click on the Raspberry to access the drop down menu
Select Accessories
Scroll over to and choose SD Card Copier

A dialog box will open
If you have the same setup as me, using the same hardware below, you will want to select the same options, otherwise you will have to choose the relevant settings for you
Copy from Device – Select the option for the SC32G
Copy to Device – Select the option for the WDS500G3
Select Start
Choose YES – to erase all contents
Click OK once the contents are copies over successfully
Select Close
Shutdown your Raspberry Pi 4
Remove your Micro SSD
Power the Pi back on, it should now boot from the USB M.2 Drive
Open a terminal
Type
sudo bash
raspi-config
Select option 6 – Advanced Options
Choose option A1 – Expand filesystem
Press Enter
Root File system will be resized
Click Ok
Reboot

You are done!

Hardware that I used:
Raspberry Pi 4 (4gb)
https://amzn.to/3q551IO

SanDisk 32GB Ultra microSDHC UHS-I Memory Card with Adapter
https://amzn.to/2Vfvo0y

CanaKit 3.5A Raspberry Pi 4 Power Supply (USB-C)
https://amzn.to/3fNTYPu

CanaKit Raspberry Pi 4 Micro HDMI Cable – 6 Feet
https://amzn.to/33u5hr9

Western Digital 500GB WD_Black SN750 NVMe
https://amzn.to/3nZ5pH4

Plugable USB C to M.2 NVMe Tool-free Enclosure
https://amzn.to/3lflV3L

Thanks for reading…….