Skip to content
Home » Ubuntu

Ubuntu

Ubuntu Linux Technology, Related Information, How-To’s, Tips, Tools, and Guides

HOW TO EXTRACT VOICES FROM YOUTUBE

For this, I use Youtube Downloader

First, you will need a Ubuntu 24.04 computer.

Next you will connect to it via the command line/terminal

Install Youtube Downloader:
sudo apt remove yt-dlp
wget https://github.com/yt-dlp/yt-dlp/releases/latest/download/yt-dlp -O ~/yt-dlp
chmod +x ~/yt-dlp
sudo mv ~/yt-dlp /usr/local/bin/yt-dlp

Then find your clip. Note the voice you want, and the times it was exclusively being used with no other interference or background. For example the subject of this voice clone was between the 1 minute 48 second mark and extended to the 2 minute 36 second mark.

here is the command you will use to extract the voice (and for security reasons I have obscured the URL so it will not work for you, and you will need to find your own url)

~/yt-dlp -x –audio-format mp3 –postprocessor-args “-ss 00:01:48 -to 00:02:33” “https://www.youtube.com/watch?v=MyMTvJRK0oM”

CREATE A VANITY .ONION URL

Unfortunately for the dark web, you do not have the ability to create a fully custom url….you need immense power to be able to create a fully custom key. However you can create a partial custom, vanity url. Here is how

On an Ubuntu system:

Open a terminal

type:
sudo su –
apt-get update
apt-get full-upgrade
apt install gcc libc6-dev libsodium-dev make autoconf
mkdir vanity
cd vanity
git clone https://github.com/cathugger/mkp224o.git
./autogen.sh
./configure
make
./mkp224o -d vanitykeys tacticalware


This will create a custom URL with the first part of it named tacticalware….which takes an immense amount of time to do… The result will look like this:
http://tacticalwarecr37tvhhrxmbs3buk3ze6vtpyouz3gy6uytdqqfvoiqrf3yyd.onion

I did not create a tacticalware onion url….because it was going to take years at the present time to do it. I did create one for my personal onion site and here it is:
http://longleycr37tvhhrxmbs3buk3ze6vtpyouz3gy6uytdqqfvoiqrf3yyd.onion

UPDATE NODE.JS ON A HOMEBRIDGE

Running a homebridge on a raspberry pi, to connect all of your IOT is fun. However node.js does not update automatically when updating the pi.

to update node.js

Open a terminal

type:
sudo hb-service update-node

The package will update

reboot

And your Node.JS is now up to date

CONFIGURE NFS ON A SYNOLOGY

Here is how I configure NFS on my synoloy so that I can copy files from my synology over to my Ubuntu 22.04 AI system that uses a JBOD

Login into your synology

Click Control Panel

Click File Services

Select the NFS Tab at the top

Place a checkmark next to Enable NFS

I use NFSv3

Then Click Apply or Save/

Go back to Control Panel

Then select Shared Folder

Click on the Share that you want to Enable NFS on

Click Edit

Then click NFS Permissions

Select Create

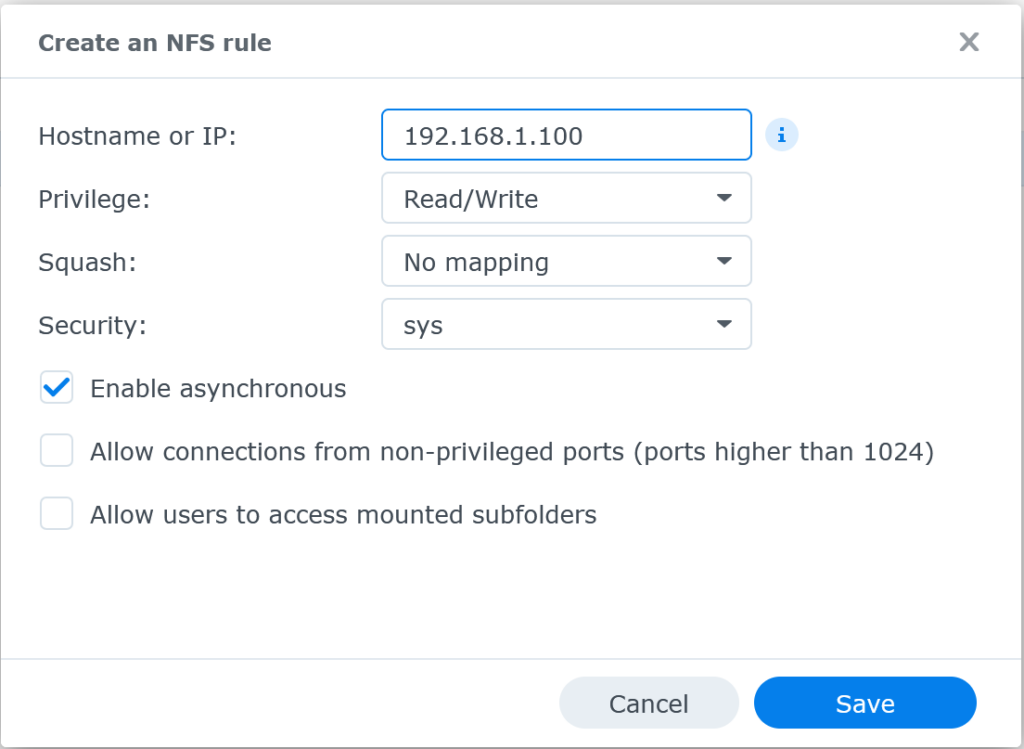
Type in the IP for your Ubuntu 22.04 computer and make sure the rest of the settings are set just like the picture here:

Click Save

Then on your Ubuntu box you will want to

Open a Terminal

sudo su –

cd /mnt

sudo mount -t nfs 192.168.1.100:/volume1/Folder /mnt/synology

replace Folder with your actual folder, and use the ip of the share you want to copy from

cd /mnt/synology

cp -R -v /mnt/synology/* /media/ubuntu/JBOD\ Disk\ 5/

this will copy everything from the synology folder that is connected to your synology, and it will place it into JBOD disk 5 (change the paths to whatever you need for you)

SPEED UP YOUR SYNOLOGY WITH THIS

By default your MTU is 1500. Here is how you increase it to 9000 to enable Jumbo Frames, with no network impact. It will speed up your system because it does not have to repeatedly send the header info on every small packet.

Login into your Synology

Go to Control Panel

Select Network

Then go to Network Interface

Select Lan 1

Then press Edit

Checkmark MTU and set the value to 9000

Click Ok

Click Yes

Then do the same for Lan 2

Thats it. You now have jumbo frames

DOCKER ON VMWARE ESXI

By default you cannot run it here.

However if you:

Shutdown the VM

Browse to the VM’s folder within VMWare’s Datastore Browser

Download the VM’s .vmx file

Open it with a text editor

add this to the bottom:
vhv.enable = “TRUE”

Save the file

Upload it back to the storage manager and overwrite the original .vmx

Power the VM back on, it will now work

RUNNING OLLAMA ON UBUNTU 24.04 WITH NVIDIA GPU

Here is a quick step by step.

Install Ubuntu 24.04 Desktop. At the time Ubuntu Server 24.04 has issues. So run this on Desktop

Login and open a terminal
sudo su –

apt-get update

apt-get upgrade

nvidia-smi
(this should show you your NVidia GPU. These drivers work well. Keep them)

apt install curl

curl -fsSL https://ollama.com/install.sh | sh

If it errors, run it a second time. It fixes the error.
curl -fsSL https://ollama.com/install.sh | sh

sudo systemctl enable ollama.service

sudo systemctl start ollama.service

ollama pull llama3:8b

ollama run llama3:8b

Open a new terminal
watch -n 0.5 nvidia-smi
You can see the GPU work

Back in the LLama2 terminal
ctrl +c
this will kill the session

Add Docker’s official GPG key by selecting below and pasting it into the terminal:
sudo apt-get update
sudo apt-get install ca-certificates curl
sudo install -m 0755 -d /etc/apt/keyrings
sudo curl -fsSL https://download.docker.com/linux/ubuntu/gpg -o /etc/apt/keyrings/docker.asc
sudo chmod a+r /etc/apt/keyrings/docker.asc

echo \
“deb [arch=$(dpkg –print-architecture) signed-by=/etc/apt/keyrings/docker.asc] https://download.docker.com/linux/ubuntu \
$(. /etc/os-release && echo “$VERSION_CODENAME”) stable” | \
sudo tee /etc/apt/sources.list.d/docker.list > /dev/null
sudo apt-get update

After the key installs:
apt-get install docker-ce docker-ce-cli containerd.io docker-buildx-plugin docker-compose-plugin

docker run -d –network=host -v open-webui:/app/backend/data -e OLLAMA_BASE_URL=http://127.0.0.1:11434 –name open-webui –restart always ghcr.io/open-webui/open-webui:main

sudo docker ps

Now open a browser and go to localhost:8080

Signup and create an account. this will be the administrator

Back in the Terminal, setup other modes:
ollama pull codegemma

ollama pull llama2:70b

ollama pull llama3:70b

ollama pull llama3

ollama pull dolphin-llama3:8b

ollama pull dolphin-llama3:8b-256k

ollama pull dolphin-llama3:70b-256k

ollama pull dolphin-llama3:70b-256k

ollama pull dolphin-llama3:70b

ollama pull llava

Now go and have fun
HOW TO SECURE YOUR TOR ONION KEYS

This is a quick guide on how to secure your Tor Onionsite from someone intercepting the keys and hijacking your domain.

Open a terminal and Type

sudo su –

Only hs_ed25519_secret_key is required for TOR to work

Copy other keys to a backup location

Do do this type:
mkdir /backup
mkdir /backup/current-tor-keys
cd /var/lib/tor/hidden_service/
cp -R ./* /backup/current-tor-keys/
rm hs_ed25519_public_key
sudo chown -R debian-tor: /var/lib/tor/hidden_service
sudo chmod -R u+rwX,og-rwx /var/lib/tor/hidden_service

Now use WinSCP and copy the keys off the server to a safe location and delete them from your /backup directory

AUTOMATIC UPDATES FOR UBUNTU 22.04

Setting up automatic updates is critical if you want to maintain a secure environment. Make sure you have automatic backups that occur prior to the updates, so you have a rollback plan.

Here are the commands to set it up.

Open a terminal:
sudo su –
apt install unattended-upgrades
systemctl status unattended-upgrades
apt install update-notifier-common
nano /etc/apt/apt.conf.d/50unattended-upgrades

Now remove the // before each of these lines, and change the values to make them relevant for your system
Unattended-Upgrade::Mail “youremailaddress@yourdomain.com”;
Unattended-Upgrade::MailReport “on-change”;
Unattended-Upgrade::Remove-Unused-Kernel-Packages “true”;
Unattended-Upgrade::Remove-Unused-Dependencies “true”;
Unattended-Upgrade::Automatic-Reboot “true”;
Unattended-Upgrade::Automatic-Reboot-WithUsers “true”;
Unattended-Upgrade::Automatic-Reboot-Time “06:00”;
Unattended-Upgrade::OnlyOnACPower “true”;

Save and Exit the file

nano /etc/apt/apt.conf.d/20auto-upgrades

Now replace the contents of the file with the info below:
APT::Periodic::Update-Package-Lists “1”;
APT::Periodic::Unattended-Upgrade “1”;

Save the File and Exit

dpkg-reconfigure -plow unattended-upgrades

Reboot your system instead of running a service restart

That’s it!

CLEAR COMMAND HISTORY IN LINUX

It is common practice to simply type in commands into a terminal and leave the terminal with never clearing the history. The problem is, if someone accesses your system, they can see everything you have done, which can be an issue.

To check your terminal history, Open a Terminal and type:
history

To clear the History, simply type:
history -c

Now you can check your history again by typing:
history

And you can see it is clear. Do this before you log off your computer every time for good measure