Skip to content
Home » Ubuntu » Page 4

Ubuntu

Ubuntu Linux Technology, Related Information, How-To’s, Tips, Tools, and Guides

DISABLE LIGHTS ON GIGABYTE MOTHERBOARDS

Most of my systems are built on linux, and linux does not have the ability to install the RGB Fusion software. For me to disable the lights on the motherboard, I have to do that from the BIOS. Here are the steps I use on my Gigabyte Motherboards:

Boot the computer
Press DEL during the boot to enter the BIOS
Scroll over to the Peripherals tab
Select RGB Fusion
Click OFF
Save & Exit
Reboot and your lights are off

Thanks for reading!

UBUNTU 20.04, 1080 TI, ETH MINING IN 2021

This is a quick guide on how to use T-Rex on your Ubuntu 20.04 mining rig to allow your NVidia 1080 Ti cards to mine Ethereum in 2021.

On the rig
Open a Terminal
sudo bash
Enter your password
mkdir /tacticalware
cd /tacticalware

If you have Cuda 10 installed, download the following, otherwise find the one for your Cuda version
wget https://github.com/trexminer/T-Rex/releases/download/0.19.5/t-rex-0.19.5-linux-cuda10.0.tar.gz
Once it is downloaded
tar -zxvf t-rex-0.19.5-linux-cuda10.0.tar.gz
cp ETC-2miners.sh tacticalware-eth.sh
nano tacticalware-eth.sh

Now modify the contents of the file. I suggest replacing the mining site, and wallet address. My file looks like this:
./t-rex -a ethash –coin eth -o stratum+tcp://us1.ethermine.org:4444 -u 0xb6c1807520Fc60e39a29cD02a859c652B2910DB8 -w tacticalware

Note that there is a double dash before –coin and –fork. Sometimes your browser will show them as a double dash, sometimes it shows as a single long dash. they are double dashes

Save the file
Exit
Now you can launch it by running
./tacticalware-eth.sh

It will begin to mine. To monitor it you can do it through a web browser. Simply look for the address when the miner begins

The address will look something like this, and be displayed right when you begin mining
ubuntu t-rex


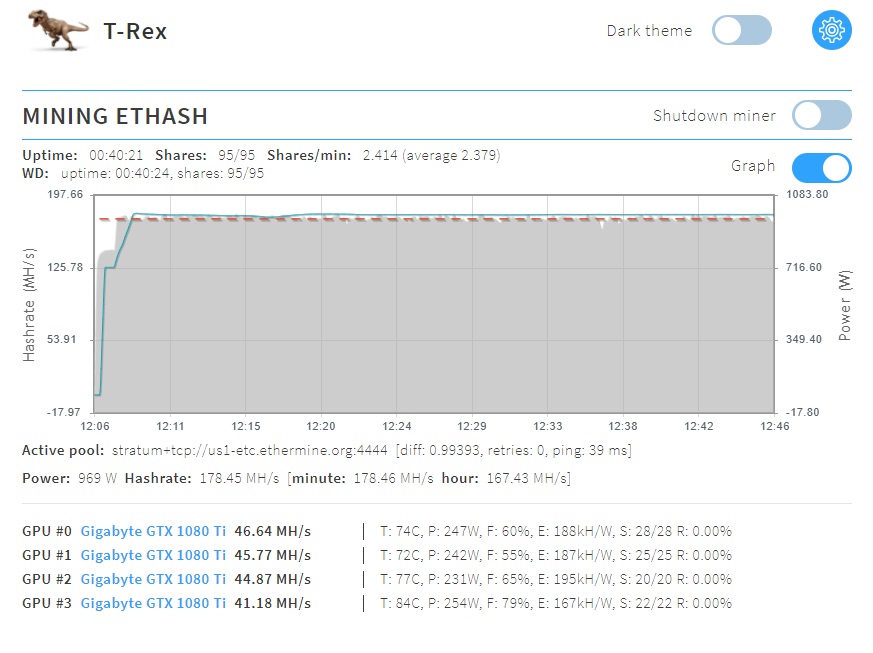
When you browse to that site you will see something that looks like this:

t-rex
That’t It. You are mining successfully. Thanks for reading

The hardware that I used in this guide:
Gigabyte AORUS GeForce GTX 1080 Ti (QTY 6):
https://amzn.to/2JqvXC8

Motherboard (QTY 1): 
https://amzn.to/2JqGJZ7

CPU (QTY 1): 
https://amzn.to/3qevp2X

Memory (QTY 1): 
https://amzn.to/2JqHn8Z

Hard Drive (QTY 1):  
https://amzn.to/3lic3X5

Risers (QTY 6):  
https://amzn.to/33rIgVE

Power Supplies (QTY 2):
https://amzn.to/3fTRpLR

Add2PSU (QTY 1):
https://amzn.to/39s4URY

Power Switch (QTY 1):  
https://amzn.to/3ljmNVk

INCREASE ETH / ETC MINING BY 50% IN 2021 USING OHGODANETHLARGEMENTPILL-R2

If you are still using an NVidia 1080 Ti card, and are trying to compete with the 2080s and 3090s these days, you need to up your hash game. There has been a tool around for the past 2 years to help with this. It is specifically designed for teh 1080 Ti cards, and has increased my hashes in the area of 50% per card. I wanted to preserve the software on github, so I created my own fork of it. The fork will not be updated, or worked on by me. It is just there so we all have a place to draw from in the long run.

For my setup, I am running Ubuntu 20.04.01, headless, and an Nvidia 1080ti. My miner is T-Rex with the setup from this guide:
https://tacticalware.com/ubuntu-20-04-etc-mining-after-epoch-390-november-2020/

Back to the guide

On your miner, open a terminal
sudo bash
cd /tacticalware
git clone https://github.com/tacticalware/ETHlargementPill.git
mv ETHlargementPill/ ohgod
cd ohgod
chmod +x OhGodAnETHlargementPill-r2
screen ./OhGodAnETHlargementPill-r2

You will see the following message:


Your system is now capable of running at 50% greater speed.

Since you used screen you can close this connection and it will still run.
To reconnect to this screen you can resume it by opening a terminal again
Typing sudo bash
Then screen -r

All that is left is to start up your mining software, configure it to mine ETH or ETC and start mining.

Enjoy the extra hashes!

The hardware that I used in this guide:
Gigabyte AORUS GeForce GTX 1080 Ti (QTY 6):
https://amzn.to/2JqvXC8

Motherboard (QTY 1): 
https://amzn.to/2JqGJZ7

CPU (QTY 1): 
https://amzn.to/3qevp2X

Memory (QTY 1): 
https://amzn.to/2JqHn8Z

Hard Drive (QTY 1):  
https://amzn.to/3lic3X5

Risers (QTY 6):  
https://amzn.to/33rIgVE

Power Supplies (QTY 2):
https://amzn.to/3fTRpLR

Add2PSU (QTY 1):
https://amzn.to/39s4URY

Power Switch (QTY 1):  
https://amzn.to/3ljmNVk


SETTING UP A CRON JOB FOR SCRAPING THROUGH NORDVPN

If any of you are like me, you find that your scrapers are limited from time to time by the number of requests you can make to a website within a certain period of time. To get around this, you can setup python scraping through nordvpn to automatically change of your IP addresses. There are other programs as well…Tor allows this for free. I personally use NORD, because I have had better performance and the cost is a few dollars per month not to have to deal with the headaches.

So I setup my cron job as follows
Every hour (9:00, 10:00, etc) it will connect to Nord
5 Mins past every hour (9:05, 10:05, etc) it will run my scraper
15 Mins past every hour (9:15, 10:15, etc) it will disconnect from Nord
30 Min past every hour (9:30, 10:30, etc) it will reconnect to Nord (this usually gives it enough time to get a different IP. If you log back in immediately you will attach to the same server. This fixes that.
35 Mins past every hour (9:35, 10:35, etc) it runs the scraper
45 Mins past every hour (9:45, 10:45, etc) it disconnects from Nord

To set this up I run the following

sudo bash

Enter Password

crontab -e

Select 1 (for nano)

Scroll to the bottom of the file and add the following:

0 * * * * /usr/bin/nordvpn connect >> /home/user/cron.log 2>&1
5 * * * * python3 /home/user/scraper.py >> /home/user/cron.log 2>&1
15 * * * * /usr/bin/nordvpn d >> /home/user/cron.log 2>&1
30 * * * * /usr/bin/nordvpn connect >> /home/user/cron.log 2>&1
35 * * * * python3 /home/user/scraper.py >> /home/user/cron.log 2>&1
45 * * * * /usr/bin/nordvpn d >> /home/user/cron.log 2>&1

Save the file, exit, and you are all set. Your scraper will run as directed

Ethereum Classic Mining with NVidia 1080Ti and Ubuntu 18.04.03

If you need help setting up the rig, you can view one of my other articles on building the rig, adding the cards, installing the drivers and so on. This guide will help you from the point that the rig is built and you have an Ethereum Classic wallet already available.

Open a terminal

mkdir /drivers && mkdir /drivers/claymore && mkdir claymore15

cd /drivers/claymore

wget

tar zxvf *

cd “C and hit the tab key to populate the rest of the name

Press Enter

mv ./* ../claymore15

cd ../

rm -R “C and hit the tab key

Press Enter

rm *z

cd claymore15

wget https://tacticalware.com/downloads/etc.txt

mv etc.txt etc.sh

chmod +x etc.sh

nano etc.sh

Change the wallet address to your wallet

Save the file and Exit

./etc.sh

And you off and mining!

The hardware that I used in this guide:
Gigabyte AORUS GeForce GTX 1080 Ti (QTY 6):
https://amzn.to/2JqvXC8

Motherboard (QTY 1): 
https://amzn.to/2JqGJZ7

CPU (QTY 1): 
https://amzn.to/3qevp2X

Memory (QTY 1): 
https://amzn.to/2JqHn8Z

Hard Drive (QTY 1):  
https://amzn.to/3lic3X5

Risers (QTY 6):  
https://amzn.to/33rIgVE

Power Supplies (QTY 2):
https://amzn.to/3fTRpLR

Add2PSU (QTY 1):
https://amzn.to/39s4URY

Power Switch (QTY 1):  
https://amzn.to/3ljmNVk

ERROR Installing AMDGPU-PRO Drivers on Ubuntu 18.04

Easy way to fix the following errors

Installing AMD Drivers on Ubuntu 18.04 has been a pain…until now. To fix the following errors you have to simply do the following

ERRORS:

The following packages have unmet dependencies:

amdgpu-pro : Depends: libvdpau-amdgpu-pro but it is not going to be installed

              Depends: clinfo-amdgpu-pro but it is not going to be installed

amdgpu-pro-dkms : Depends: dkms (>= 1.95) but it is not going to be installed

amdgpu-pro-lib32 : Depends: libdrm-amdgpu-pro-amdgpu1:i386

                    Depends: libgbm1-amdgpu-pro:i386

                    Depends: libgl1-amdgpu-pro-glx:i386

Etc, etc, etc………

To fix it, at the command line, type the following:

sudo dpkg –add-architecture i386

Now try the install again:

sudo ./amdgpu-pro-install -y

AND IT FINALLY WORKS!

Deleting Linux Partitions on USB Drive From Windows 10

How to Delete Linux Partitions on USB Drive using DISKPART on Windows 10

On your Windows 10 computer, insert the linux USB drive

Press the Windows + R button on your keyboard

In the newly launched RUN box, type:

diskpart

And press Enter

From the DISKPART box, type in the following commands

list disk

Now find your USB Drive.  My USB Drive is Disk 1, so I will use that for the rest of the guide.

select disk 1

list partition

select partition 1

delete partition 1 override

select partition 2

delete partition 2 override

Do those steps until you have deleted all of the partitions.  Close the dialog box.  Remove the Drive, and you are ready to go with a new, fresh, unformatted drive.


Mount USB Drive

How to Mount a USB Drive on Ubuntu Server

Login

sudo bash

fdisk -l

Identify the usb drive by looking for the size/name/etc and then note the path (ex /dev/sdb)

mount /dev/sdb /mnt

cd /mnt

Now you should see your files!