Skip to content
Home » ender

ender

Visit Tacticalware.com for information related to this tag and others. We look forward to assisting in your tech projects with our in-depth knowledgebase…

SIMPLIFY3D SETTINGS FOR A DIRECT DRIVE ENDER 3 PRO USING eSUN’S PETG IN BLACK

I am in the process of putting together several posts, which detail my printer hardware, along with giving you a copy of my FFF profile for that setup. For this post I am using Simplify3D to Slice eSUN’s PETG in Black, on a Creality Ender 3 Pro with a Direct Drive setup, using a Micro Swiss Hotend.

Slicer Profile can be downloaded here:
https://tacticalware.com/downloads/Tacticalware_Direct_Drive_Ender_3_Pro_ESUN_Black_PETG.fff

Hardware that I used:
Ender 3 Pro

Direct Drive
https://amzn.to/2IR0usR

Hotend
https://amzn.to/37iIrVW

Tubing
https://amzn.to/2IQ8V7N

eSun PETG
https://amzn.to/34fRxke

And I have the following gear in place running Octoprint:
Raspberry Pi 4 (4gb)
https://amzn.to/3q551IO

SanDisk 32GB Ultra microSDHC UHS-I Memory Card with Adapter
https://amzn.to/2Vfvo0y

CanaKit 3.5A Raspberry Pi 4 Power Supply (USB-C)
https://amzn.to/3fNTYPu

CanaKit Raspberry Pi 4 Micro HDMI Cable – 6 Feet
https://amzn.to/33u5hr9

Western Digital 500GB WD_Black SN750 NVMe
https://amzn.to/3nZ5pH4

Plugable USB C to M.2 NVMe Tool-free Enclosure
https://amzn.to/3lflV3L

The most important thing is after you setup your system, you will need to dial it in. For that, you can refer to these pages:
Configure your Extrusion Multiplier:
https://tacticalware.com/ender-3-pro-simplify3d-configuring-the-extrusion-multiplier/

Confirm your heat settings:
https://tacticalware.com/3d-printing-heat-tower/

Thanks for reading!
SIMPLIFY3D SETTINGS FOR A DIRECT DRIVE ENDER 3 PRO USING HATCHBOX’S PETG IN BLACK

I am in the process of putting together several posts, which detail my printer hardware, along with giving you a copy of my FFF profile for that setup. For this post I am using Simplify3D to Slice Hatchbox’s PETG in Black, on a Creality Ender 3 Pro with a Direct Drive setup, using a Micro Swiss Hotend.

Slicer Profile can be downloaded here:
https://tacticalware.com/downloads/Tacticalware_Direct_Drive_Ender_3_Pro_HATCHBOX_Black_PETG.fff

Hardware that I used:
Ender 3 Pro

Direct Drive
https://amzn.to/2IR0usR

Hotend
https://amzn.to/37iIrVW

Tubing
https://amzn.to/2IQ8V7N

Hatchbox PETG
https://amzn.to/385qWHQ

And I have the following gear in place running Octoprint:
Raspberry Pi 4 (4gb)
https://amzn.to/3q551IO

SanDisk 32GB Ultra microSDHC UHS-I Memory Card with Adapter
https://amzn.to/2Vfvo0y

CanaKit 3.5A Raspberry Pi 4 Power Supply (USB-C)
https://amzn.to/3fNTYPu

CanaKit Raspberry Pi 4 Micro HDMI Cable – 6 Feet
https://amzn.to/33u5hr9

Western Digital 500GB WD_Black SN750 NVMe
https://amzn.to/3nZ5pH4

Plugable USB C to M.2 NVMe Tool-free Enclosure
https://amzn.to/3lflV3L

The most important thing is after you setup your system, you will need to dial it in. For that, you can refer to these pages:
Configure your Extrusion Multiplier:
https://tacticalware.com/ender-3-pro-simplify3d-configuring-the-extrusion-multiplier/

Confirm your heat settings:
https://tacticalware.com/3d-printing-heat-tower/


Thanks for reading!
SIMPLIFY3D SETTINGS FOR A DIRECT DRIVE ENDER 3 PRO USING SainSmart’s TPU

I am in the process of putting together several posts, which detail my printer hardware, along with giving you a copy of my FFF profile for that setup. For this post I am using Simplify3D to Slice SainSmart’s TPU, on a Creality Ender 3 Pro with a Direct Drive setup, using a Micro Swiss Hotend.

Slicer Profile can be downloaded here:
https://tacticalware.com/downloads/Tacticalware_Direct_Drive_Ender_3_Pro_SainSmart_TPU_Red.fff

Hardware that I used:
Ender 3 Pro

Direct Drive
https://amzn.to/2IR0usR

Hotend
https://amzn.to/37iIrVW

Tubing
https://amzn.to/2IQ8V7N

SainSmart Red TPU
https://amzn.to/3mmCOdB

And I have the following gear in place running Octoprint:
Raspberry Pi 4 (4gb)
https://amzn.to/3q551IO

SanDisk 32GB Ultra microSDHC UHS-I Memory Card with Adapter
https://amzn.to/2Vfvo0y

CanaKit 3.5A Raspberry Pi 4 Power Supply (USB-C)
https://amzn.to/3fNTYPu

CanaKit Raspberry Pi 4 Micro HDMI Cable – 6 Feet
https://amzn.to/33u5hr9

Western Digital 500GB WD_Black SN750 NVMe
https://amzn.to/3nZ5pH4

Plugable USB C to M.2 NVMe Tool-free Enclosure
https://amzn.to/3lflV3L

The most important thing is after you setup your system, you will need to dial it in. For that, you can refer to these pages:
Configure your Extrusion Multiplier:
https://tacticalware.com/ender-3-pro-simplify3d-configuring-the-extrusion-multiplier/

Confirm your heat settings:
https://tacticalware.com/3d-printing-heat-tower/

Thanks for reading!
SIMPLIFY3D SETTINGS FOR A DIRECT DRIVE ENDER 3 PRO USING eSUN PLA+ BLACK

I am in the process of putting together several posts, which detail my printer hardware, along with giving you a copy of my FFF profile for that setup. For this post I am using Simplify3D to Slice eSUN’s PLA+ in Black, on a Creality Ender 3 Pro with a Direct Drive setup, using a Micro Swiss Hotend.

Slicer Profile can be downloaded here:
https://tacticalware.com/downloads/Tacticalware_Direct_Drive Ender_3_Pro_ESUN_Black_PLA.fff

Hardware that I used:
Ender 3 Pro

Direct Drive
https://amzn.to/2IR0usR

Hotend
https://amzn.to/37iIrVW

Tubing
https://amzn.to/2IQ8V7N

eSun PLA+
https://amzn.to/37gdSjs

And I have the following gear in place running Octoprint:
Raspberry Pi 4 (4gb)
https://amzn.to/3q551IO

SanDisk 32GB Ultra microSDHC UHS-I Memory Card with Adapter
https://amzn.to/2Vfvo0y

CanaKit 3.5A Raspberry Pi 4 Power Supply (USB-C)
https://amzn.to/3fNTYPu

CanaKit Raspberry Pi 4 Micro HDMI Cable – 6 Feet
https://amzn.to/33u5hr9

Western Digital 500GB WD_Black SN750 NVMe
https://amzn.to/3nZ5pH4

Plugable USB C to M.2 NVMe Tool-free Enclosure
https://amzn.to/3lflV3L

The most important thing is after you setup your system, you will need to dial it in. For that, you can refer to these pages:
Configure your Extrusion Multiplier:
https://tacticalware.com/ender-3-pro-simplify3d-configuring-the-extrusion-multiplier/

Confirm your heat settings:
https://tacticalware.com/3d-printing-heat-tower/


Thanks for reading!
SIMPLIFY3D SETTINGS FOR AN ENDER 3 PRO USING ESUN’S White PLA+

I am in the process of putting together several posts, which detail my printer hardware, along with giving you a copy of my FFF profile for that setup. For this post I am using Simplify3D to Slice eSun’s White PLA+, on a Creality Ender 3 Pro using a Micro Swiss Hotend. If you have already downloaded and are using my eSun Black PLA FFF file, you will still need this one. Different Colors require different settings.

Slicer Profile can be downloaded here:
https://tacticalware.com/downloads/Tacticalware_Ender_3_Pro_eSun_White_PLA.fff

Hardware that I used:
Ender 3 Pro


Hotend
https://amzn.to/37iIrVW

Tubing
https://amzn.to/2IQ8V7N

eSun White PLA+
https://amzn.to/3gLFU9T

And I have the following gear in place running Octoprint:
Raspberry Pi 4 (4gb)
https://amzn.to/3q551IO

SanDisk 32GB Ultra microSDHC UHS-I Memory Card with Adapter
https://amzn.to/2Vfvo0y

CanaKit 3.5A Raspberry Pi 4 Power Supply (USB-C)
https://amzn.to/3fNTYPu

CanaKit Raspberry Pi 4 Micro HDMI Cable – 6 Feet
https://amzn.to/33u5hr9

Western Digital 500GB WD_Black SN750 NVMe
https://amzn.to/3nZ5pH4

Plugable USB C to M.2 NVMe Tool-free Enclosure
https://amzn.to/3lflV3L

The most important thing is after you setup your system, you will need to dial it in. For that, you can refer to these pages:
Configure your Extrusion Multiplier:
https://tacticalware.com/ender-3-pro-simplify3d-configuring-the-extrusion-multiplier/

Confirm your heat settings:
https://tacticalware.com/3d-printing-heat-tower/

Thanks for reading!
SIMPLIFY3D SETTINGS FOR AN ENDER 3 PRO USING ESUN’S BLACK PLA

I am in the process of putting together several posts, which detail my printer hardware, along with giving you a copy of my FFF profile for that setup. For this post I am using Simplify3D to Slice eSun’s Black PLA, on a Creality Ender 3 Pro using a Micro Swiss Hotend.

Slicer Profile can be downloaded here:
https://tacticalware.com/downloads/Tacticalware_Ender_3_Pro_ESUN_Black_PLA.fff

Hardware that I used:
Ender 3 Pro


Hotend
https://amzn.to/37iIrVW

Tubing
https://amzn.to/2IQ8V7N

eSun PLA+
https://amzn.to/37gdSjs


And I have the following gear in place running Octoprint:
Raspberry Pi 4 (4gb)
https://amzn.to/3q551IO

SanDisk 32GB Ultra microSDHC UHS-I Memory Card with Adapter
https://amzn.to/2Vfvo0y

CanaKit 3.5A Raspberry Pi 4 Power Supply (USB-C)
https://amzn.to/3fNTYPu

CanaKit Raspberry Pi 4 Micro HDMI Cable – 6 Feet
https://amzn.to/33u5hr9

Western Digital 500GB WD_Black SN750 NVMe
https://amzn.to/3nZ5pH4

Plugable USB C to M.2 NVMe Tool-free Enclosure
https://amzn.to/3lflV3L

The most important thing is after you setup your system, you will need to dial it in. For that, you can refer to these pages:
Configure your Extrusion Multiplier:
https://tacticalware.com/ender-3-pro-simplify3d-configuring-the-extrusion-multiplier/

Confirm your heat settings:
https://tacticalware.com/3d-printing-heat-tower/

Thanks for reading!
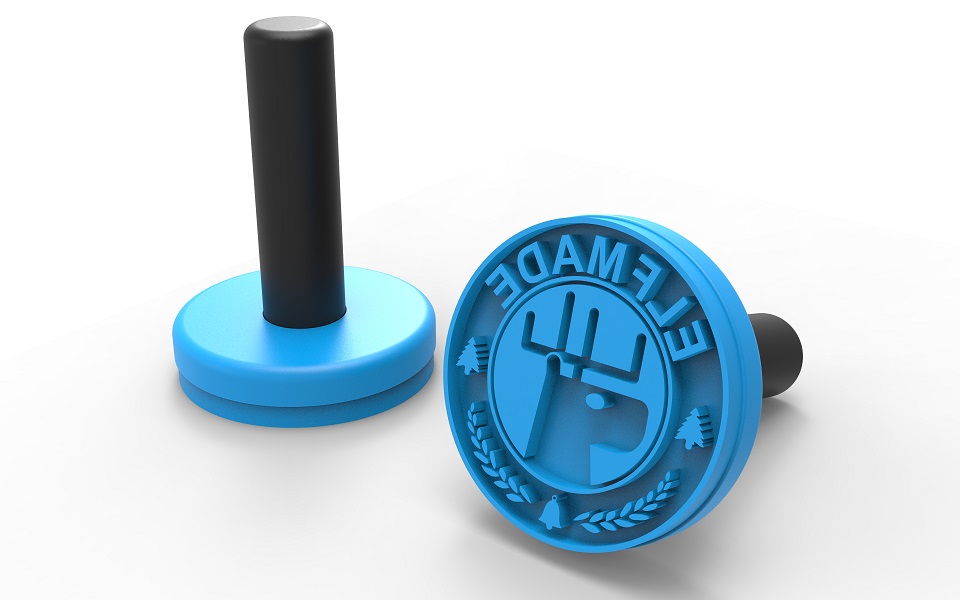
ELF MADE STAMP STL FROM SANTA CLAUS THE MOVIE

So I was watching Santa Claus the Movie…you know, that old movie from the 80s:
https://www.imdb.com/title/tt0089961/

In the movie, the Elves have this stamp that they stamp onto each of the toys they make…and in having little ones, I needed to get my hands on it.

Coincidently enough, I couldn’t find it online, as an STL….so I had one made, and want to give it to you as a Gift.

Elf Made Stamp STL


You can download it here:
https://tacticalware.com/downloads/Elf_Made.zip

Or directly from Thingiverse at:
https://www.thingiverse.com/thing:4685864

Hardware that I used to print it:
Ender 3 Pro

Hotend
https://amzn.to/37iIrVW

Tubing
https://amzn.to/2IQ8V7N

eSun Black PLA+ (For the Handle)
https://amzn.to/37gdSjs

TPU (For the Stamp)
https://amzn.to/3mmCOdB

And I have the following gear in place running Octoprint:
Raspberry Pi 4 (4gb)
https://amzn.to/3q551IO

SanDisk 32GB Ultra microSDHC UHS-I Memory Card with Adapter
https://amzn.to/2Vfvo0y

CanaKit 3.5A Raspberry Pi 4 Power Supply (USB-C)
https://amzn.to/3fNTYPu

CanaKit Raspberry Pi 4 Micro HDMI Cable – 6 Feet
https://amzn.to/33u5hr9

Western Digital 500GB WD_Black SN750 NVMe
https://amzn.to/3nZ5pH4

Plugable USB C to M.2 NVMe Tool-free Enclosure
https://amzn.to/3lflV3L

The most important thing is after you setup your system, before you print this stamp, is to calibrate your system for these filaments. You will need to do it for both the PLA+ and the TPU. For that, you can refer to these pages:
Configure your Extrusion Multiplier:
https://tacticalware.com/ender-3-pro-simplify3d-configuring-the-extrusion-multiplier/

Confirm your heat settings:
https://tacticalware.com/3d-printing-heat-tower/

Thanks for reading!


PETG – JAMMING HOTEND, BRITTLE LAYERS AND BREAKS EASILY [SOLVED]


Let’s start here…some PETG prints were amazing…clips, guides, knobs, just about anything without a long flat layer that had infill.

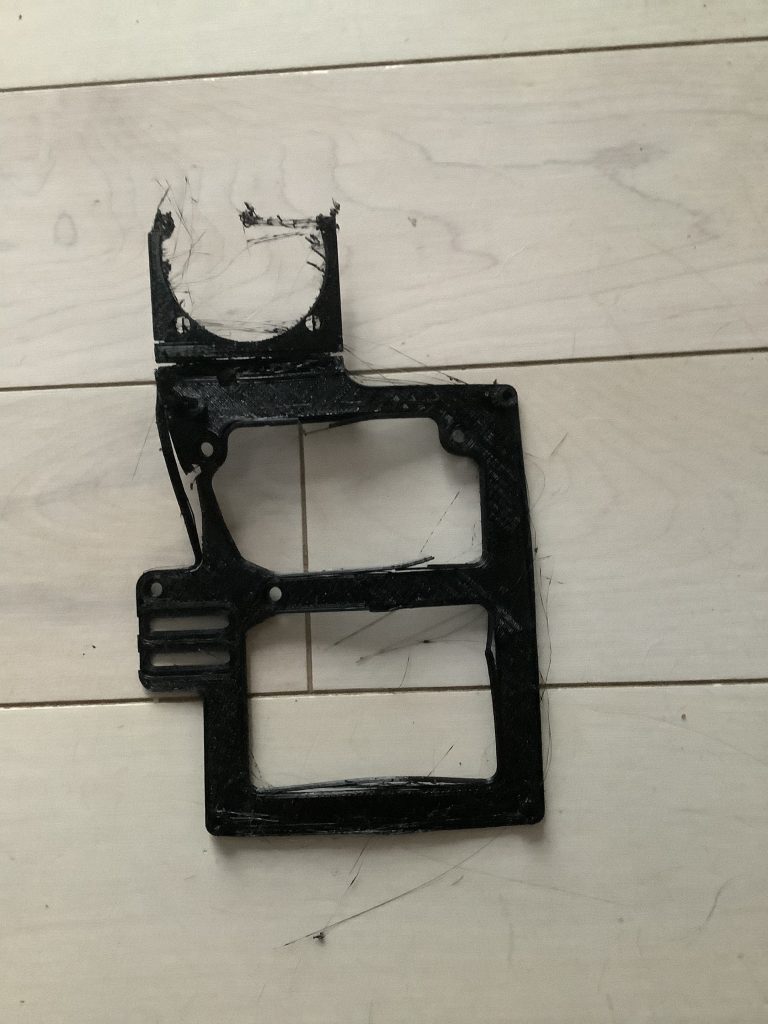
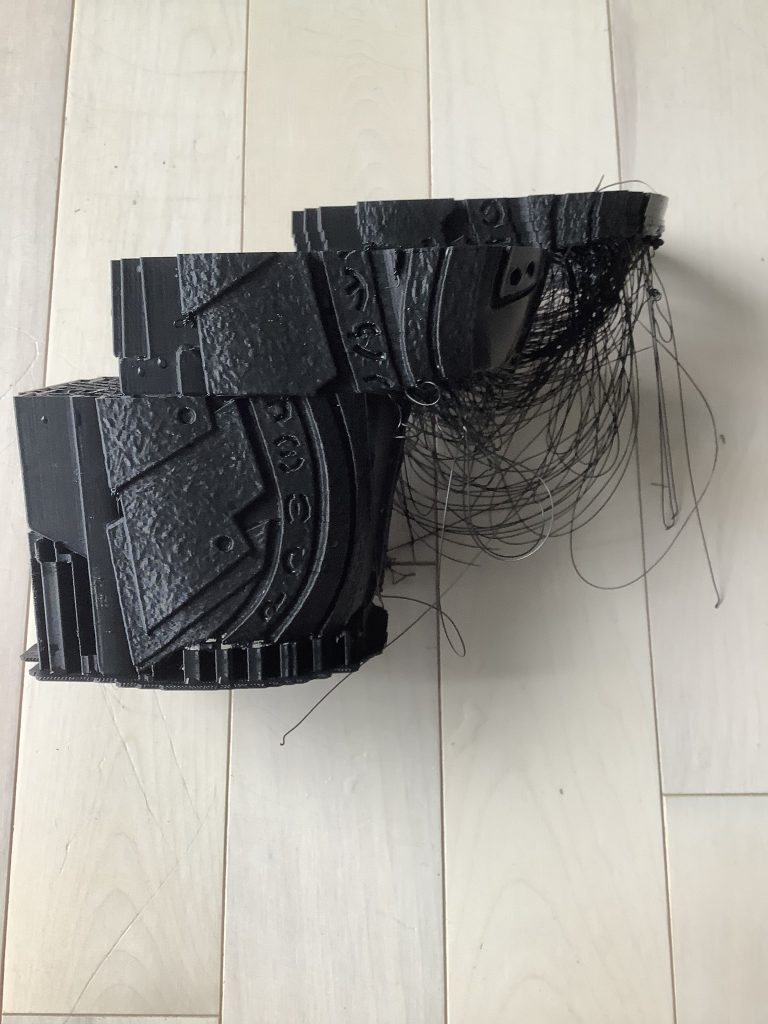
Then began my struggle (see the image below)


After meticulously dialing in my system, running retraction tests, heat towers, extrusion stepper modifications, extrusion multipliers, drying out filament and many many other steps to prep my system for a successful run with PETG prints…. My hotend kept jamming or under extruding, the extruder would click and click, and my prints were terrible.

After it would finish printing, it would break apart by simply touching it….

The solution to this…..

Open Simplify3D

Modify the FFF process

Go to the cooling tab

Set cooling on Layer 1 to 0

Remove all other setpoints

Uncheck the box that says Increase fan speed for layers below

Save, reslice and reprint

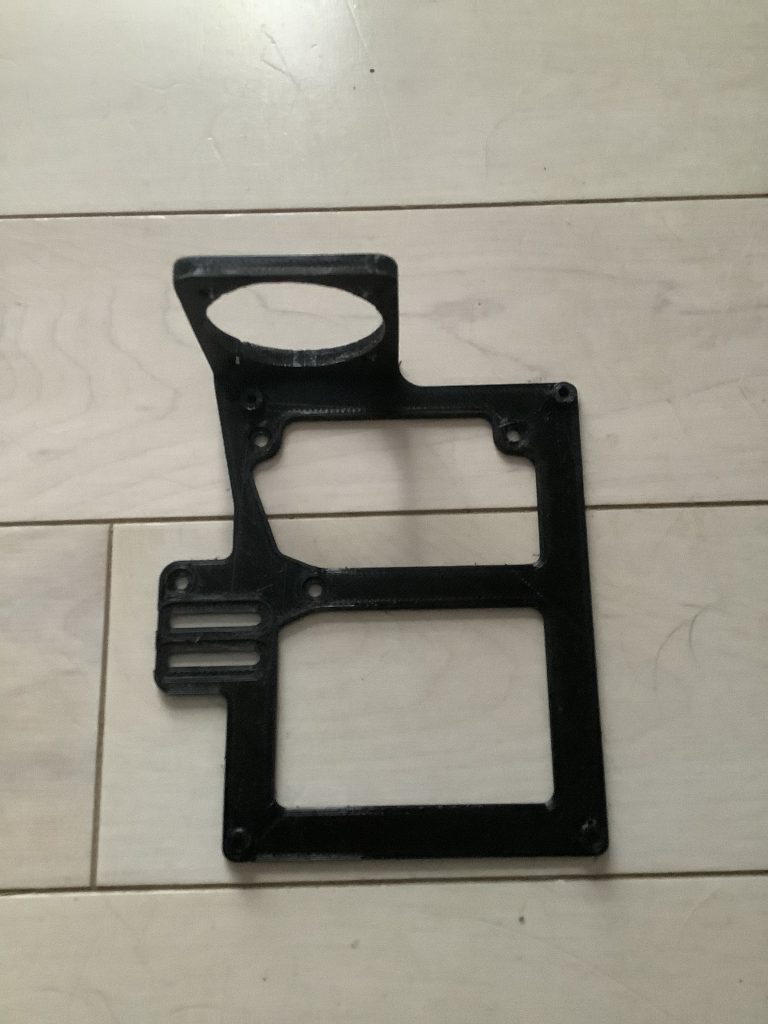
The result…

A solid print in PETG

PETG loves heat….and is ruined with cooling

Now It’s time for me to go back around and reconfigure my system with the extrusion multiplier, speed tests, heat towers, retraction tests….everything

Dimensional Accuracy with PETG on the Ender 3 Pro aka Elephants Foot [SOLVED]

In printing PETG On the ender three pro I found a variety of settings and examples and temperatures all of which are great suggestions and will leave me in the direction that I need to go however none of them are exact to what I need.

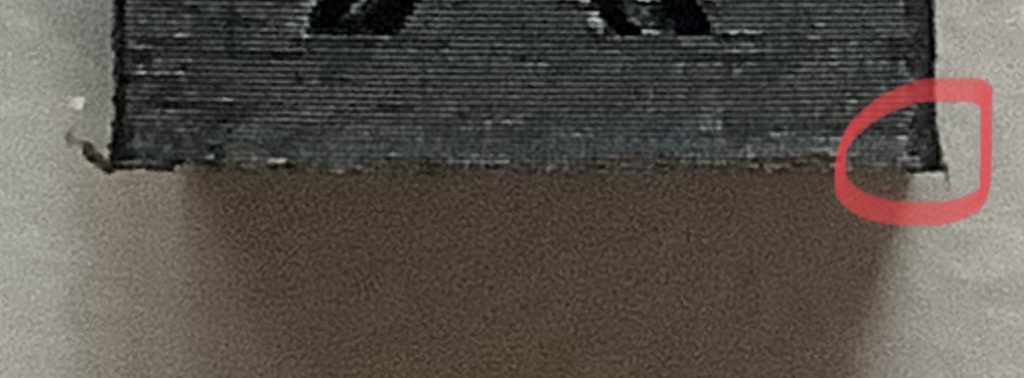
So I started with printing the calibration cube and found the X and Y axis are fine, however the Z axis seems to have some extra squish to it meaning that it’s about 0.3 mm too short, and those first few layers seem to bow outwards

Down my settings are as follows

PETG – AmazonBasics PETG Black

Nozzle – 250C

Bed – 80C

Printer – Ender 3 Pro

after a bit of measuring and fine-tuning I found that my bed temperature was too high so the solution was very simple.

Change the bed temperature to 60C and re-print

Problem solved and my next cube had the perfect dimensions

Ended 3 Pro – Massive Layer Shift in Mid Print [SOLVED]

OK so I was in the middle of printing the gauntlet from the predator costume and about halfway through the print a massive layer shift occurred. Continuing on with the print thinking that I can just cut that Layer and reattach it properly another massive layer shift happened.

Layer shift generally happens very early on in the print out is because a base layer essentially had issues. With this being so far and you can tell that’s not the case at all …. so what was causing all this

After re-slicing and re-printing check in the environmental factors and 100 other things the final verdict on it was……

Heat!

This was printed in an enclosure in the ambient temperature was above 90°F. This temperature in the enclosure caused the later shift because one of the Axis motors temporarily overheated and shut down, all while the other two motors kept on printing. When the motor restarted it was in the wrong position causing the later shift.