Skip to content
Home » Ubuntu » Page 3

Ubuntu

Visit Tacticalware.com for information related to this tag and others. We look forward to assisting in your tech projects with our in-depth knowledgebase…

RASPBERRY PI – NORDVPN INSTALL

This is a quick how to on setting up NORD VPN on a Raspberry Pi.

First you are going to want to make sure you are on the same platform as me, for these directions to apply, line by line.
https://tacticalware.com/install-ubuntu-desktop-20-10-64-bit-os-on-raspberry-pi-4/

Open a Terminal
sudo bash
Enter your password
apt-get update
apt-get upgrade
y
mkdir /installs
cd /installs
mkdir nordvpn
cd nordvpn

wget -qnc https://repo.nordvpn.com/deb/nordvpn/debian/pool/main/nordvpn-release_1.0.0_all.deb

sudo dpkg -i nordvpn-release_1.0.0_all.deb
apt-get update
apt install nordvpn
y

nordvpn login
Enter username
Enter password
nordvpn connect

You are now connected to the VPN!

Hardware I used:
Raspberry Pi 4 (4gb)
https://amzn.to/3q551IO

SanDisk 32GB Ultra microSDHC UHS-I Memory Card with Adapter
https://amzn.to/2Vfvo0y

CanaKit 3.5A Raspberry Pi 4 Power Supply (USB-C)
https://amzn.to/3fNTYPu

CanaKit Raspberry Pi 4 Micro HDMI Cable – 6 Feet
https://amzn.to/33u5hr9

SanDisk MobileMate USB 3.0 microSD Card Reader (Only needed if you dont have a Micro SD Reader/Writer slot in your computer)
https://amzn.to/39toi0G

CHROME REMOTE DESKTOP ON HEADLESS UBUNTU 20.04

Since the latest teamviewer update, I have had to switch away from it altogether for a better alternative. Enter Chrome Remote Desktop… This package allows me to connect to my Windows computers, and linux computers in a similar manner, and also allows for me to connect to my headless mining rigs. The guide below details how I set up chrome remote desktop on headless ubuntu 20.04 rig.

sudo bash

apt update

apt-get install –assume-yes wget

wget https://dl.google.com/linux/direct/chrome-remote-desktop_current_amd64.deb

dpkg –install chrome-remote-desktop_current_amd64.deb
apt install –assume-yes –fix-broken

sudo DEBIAN_FRONTEND=noninteractive \
apt install –assume-yes xfce4 desktop-base

sudo bash -c ‘echo “exec /etc/X11/Xsession /usr/bin/xfce4-session” > /etc/chrome-remote-desktop-session’

sudo apt install –assume-yes xscreensaver

sudo systemctl disable lightdm.service

sudo usermod -a -G chrome-remote-desktop $USER

exit

On a different computer
Open the Chrome browser
Go to
https://remotedesktop.google.com/headless
Sign In
Click Begin
Select Next
Click Authorize

Copy the code that looks like this:
DISPLAY= /opt/google/chrome-remote-desktop/start-host \
–code=”4/xxxxxxxxxxxxxxxxxxxxxxxx” \
–redirect-url=”https://remotedesktop.google.com/_/oauthredirect” \
–name=


Enter in a six digit pin
Confirm the pin
Enter in your sudo password

Your installation should be complete

Open Chrome Remote Desktop on a computer, and connect to your headless system.

Thanks for reading

MINING ETC ON UBUNTU WITH NVIDIA 1080TI

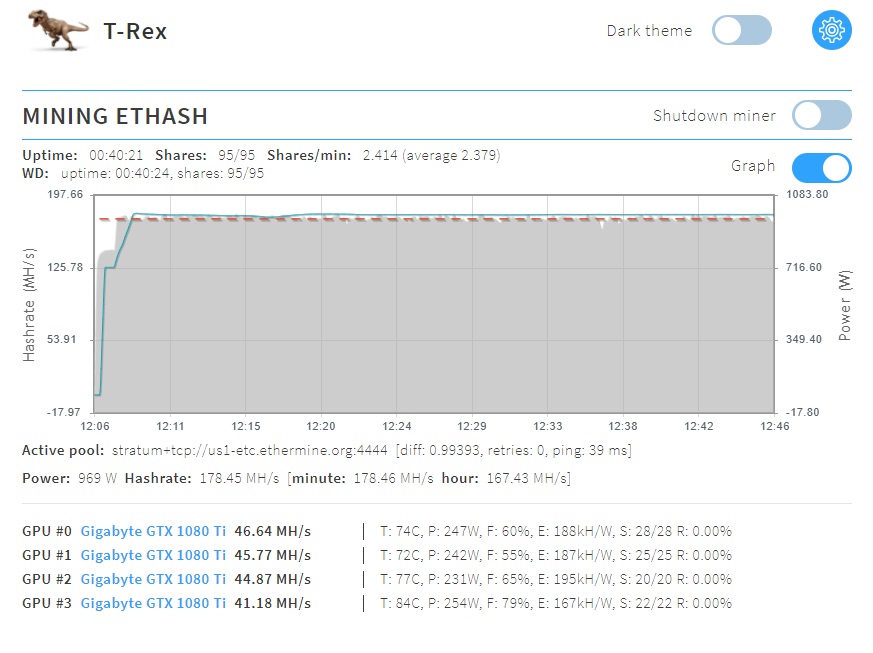
Recently I had to change the software on my rig. My rig is mining ETC on Ubuntu with NVidia 1080TI cards. I had to change it because claymore was not working the way it should with the site ethermine, hence the need to change mining software from claymore to ethminer. The following guide is how i did it.

Login to the headless rig
sudo bash
cd /
mkdir /miner
cd /miner
wget https://github.com/ethereum-mining/ethminer/releases/tag/v0.18.0

Once it downloads you then run
tar -zxvf *.gz
The software will unpack

cd bin
wget https://tacticalware.com/downloads/etc-ethminer.txt
mv etc.txt etc.sh
chmod +x etc.sh
nano etc.sh

Change the wallet address to your wallet
Save the file and Exit
./etc.sh

You should now be mining. Be sure to look at https://etc.ethermine.org/ and monitor your wallet to verify that it is sending data back and forth to the site. It should take about 15 minutes to show up initially, so be patient.


The hardware that I used in this guide:
Gigabyte AORUS GeForce GTX 1080 Ti (QTY 6):
https://amzn.to/2JqvXC8

Motherboard (QTY 1): 
https://amzn.to/2JqGJZ7

CPU (QTY 1): 
https://amzn.to/3qevp2X

Memory (QTY 1): 
https://amzn.to/2JqHn8Z

Hard Drive (QTY 1):  
https://amzn.to/3lic3X5

Risers (QTY 6):  
https://amzn.to/33rIgVE

Power Supplies (QTY 2):
https://amzn.to/3fTRpLR

Add2PSU (QTY 1):
https://amzn.to/39s4URY

Power Switch (QTY 1):  
https://amzn.to/3ljmNVk

UBUNTU 20.04 HEADLESS MINING

This one is quick and easy guide on how to Disable the GUI, for those of you who are like me, and do not want the extra processing cycles wasted on a gui…Here you go.

Log into your system

Open a terminal

sudo bash

systemctl set-default multi-user

Reboot your computer

Voila…headless mining rig

INSTALL NVIDIA 1080TI DRIVERS ON UBUNTU 20.04

These directions are quick, easy How-To on to install Nvidia 1080TI drivers, and these next steps will give you the exact commands that I use to get the drivers installed on my headless mining rig.

Open Terminal
sudo bash
apt-get install ubuntu-drivers-common
y

Check nvidia driver version
ubuntu-drivers devices

The following will show on the screen
vendor   : NVIDIA Corporation
model    : GP102 [GeForce GTX 1080 Ti]
driver   : nvidia-driver-440-server – distro non-free
driver   : nvidia-driver-450 – distro non-free recommended
driver   : nvidia-driver-450-server – distro non-free

Select which driver you want….in my case I selected 450 server, so then I run
apt install nvidia-driver-450-server

Reboot after the install finishes

Login
Open a terminal
sudo bash
nvidia-smi

This will verify install nvidia 1080TI drivers have been installed properly

The hardware that I used in this guide:
Gigabyte AORUS GeForce GTX 1080 Ti (QTY 6):
https://amzn.to/2JqvXC8

Motherboard (QTY 1): 
https://amzn.to/2JqGJZ7

CPU (QTY 1): 
https://amzn.to/3qevp2X

Memory (QTY 1): 
https://amzn.to/2JqHn8Z

Hard Drive (QTY 1):  
https://amzn.to/3lic3X5

Risers (QTY 6):  
https://amzn.to/33rIgVE

Power Supplies (QTY 2):
https://amzn.to/3fTRpLR

Add2PSU (QTY 1):
https://amzn.to/39s4URY

Power Switch (QTY 1):  
https://amzn.to/3ljmNVk

TEAMVIEWER 15.10 BROKEN ON UBUNTU 20.04

Teamviewer 15.10 on Ubuntu 20.04, does not work, end of story…For any of you who have been using teamviewer for a while now on your personal systems, teamviewer being broken on Ubuntu is nothing new…keeps happening, and is a HUUUUUGE pain, especially when you are running a mining rig at your house, and you are away for work. Well to fix it this time it is time is a bit easier, however I am not sure how long this fix will last. Teamviewer has an almost magical way of ruining these workarounds. Now, onto the fix…This is the quick fix to remove and replace teamviewer, with a working version of it on Ubuntu Server 20.04

Open a terminal
sudo bash
apt remove teamviewer
apt-get update
apt-get install gdebi-core
wget https://download.teamviewer.com/download/linux/version_14x/teamviewer-host_amd64.deb
dpkg -i teamviewer-host_amd64.deb

If it fails, that’s ok because we will fix it here
apt-get -f install
y

After it installs successfully then type
teamviewer info

Take a note of your Teamviewer ID, you will need it later
teamviewer passwd YOURPASSWORDHERE

Now open teamviewer on another computer that you are logged into

Add the computer using the menu “Add Computer“ enter in your Teamviewer ID and the Password you used in YOURPASSWORDHERE

You can now Connect and your workaround to teamviewer 15.10 on ubuntu 20.04 should now be in place

IMAGEMAGICK CONVERTING PDF TO IMAGE FAILS [SOLVED]

When attempting to convert a PDF to a Tiff, using imagemagick, converting fails and the following error occurs:

convert-im6.q16: attempt to perform an operation not allowed by the security policy PDF' @ error/constitute.c/IsCoderAuthorized/408. convert-im6.q16: no images definedoutput.tiff’ @ error/convert.c/ConvertImageCommand/3258.

To fix the error:
Open a Terminal

sudo bash

nano /etc/ImageMagick-6/policy.xml

scroll down near the bottom of the file and change
policy domain=”coder” rights=”none” pattern=”PDF”
to
policy domain=”coder” rights=”read | write” pattern=”PDF”

Save, exit, and you can now convert the PDF to Tiff

“MySQL: Host ‘IP’ is not allowed to connect to this MariaDB server”

If you are trying to connect Power BI to a Mysql/MariaDB server and receive the error “MySQL: Host ‘IP’ is not allowed to connect to this MariaDB server” perform the following

Login into the server via ssh

sudo bash

mysql -u root -p

Enter your mysql password

Type in the following:

CREATE USER 'newusernamehere'@'localhost' IDENTIFIED BY 'newpassword';
GRANT ALL PRIVILEGES ON *.* TO 'newusernamehere'@'localhost' WITH GRANT OPTION;
CREATE USER 'newusernamehere'@'%' IDENTIFIED BY 'newpassword';
GRANT ALL PRIVILEGES ON *.* TO 'newusernamehere'@'%' WITH GRANT OPTION;

Now retry your connection in Power BI using the new user and password you specified above

OPEN PORT 3306 ON UBUNTU 20.04 SERVER WITH MARIADB

Login to the server via ssh

sudo bash

nano /etc/mysql/mariadb.conf.d/50-server.cnf

Uncomment the line:
#port = 3306

Change 127.0.0.1 to the address of your server
bind-address = 192.168.1.100

Save the file, exit, and either reboot the server or restart the service.